Creating a Miniature Potions Laboratory
Quote from Logan on December 17, 2022, 8:51 pmHello!
I'm so excited to share with you this project that I'm working on! I have cleared out a section of shelf in my closet and will be turning it into a mini potions lab and study for our favorite Potions Master.
I will be posting updates and progress here in this thread, so check back to see where I'm at! If you have any suggestions I'm keen to hear them as well. I'm a total amateur at miniatures, but I have a few handy skills so I'm hoping to do justice to the concept.
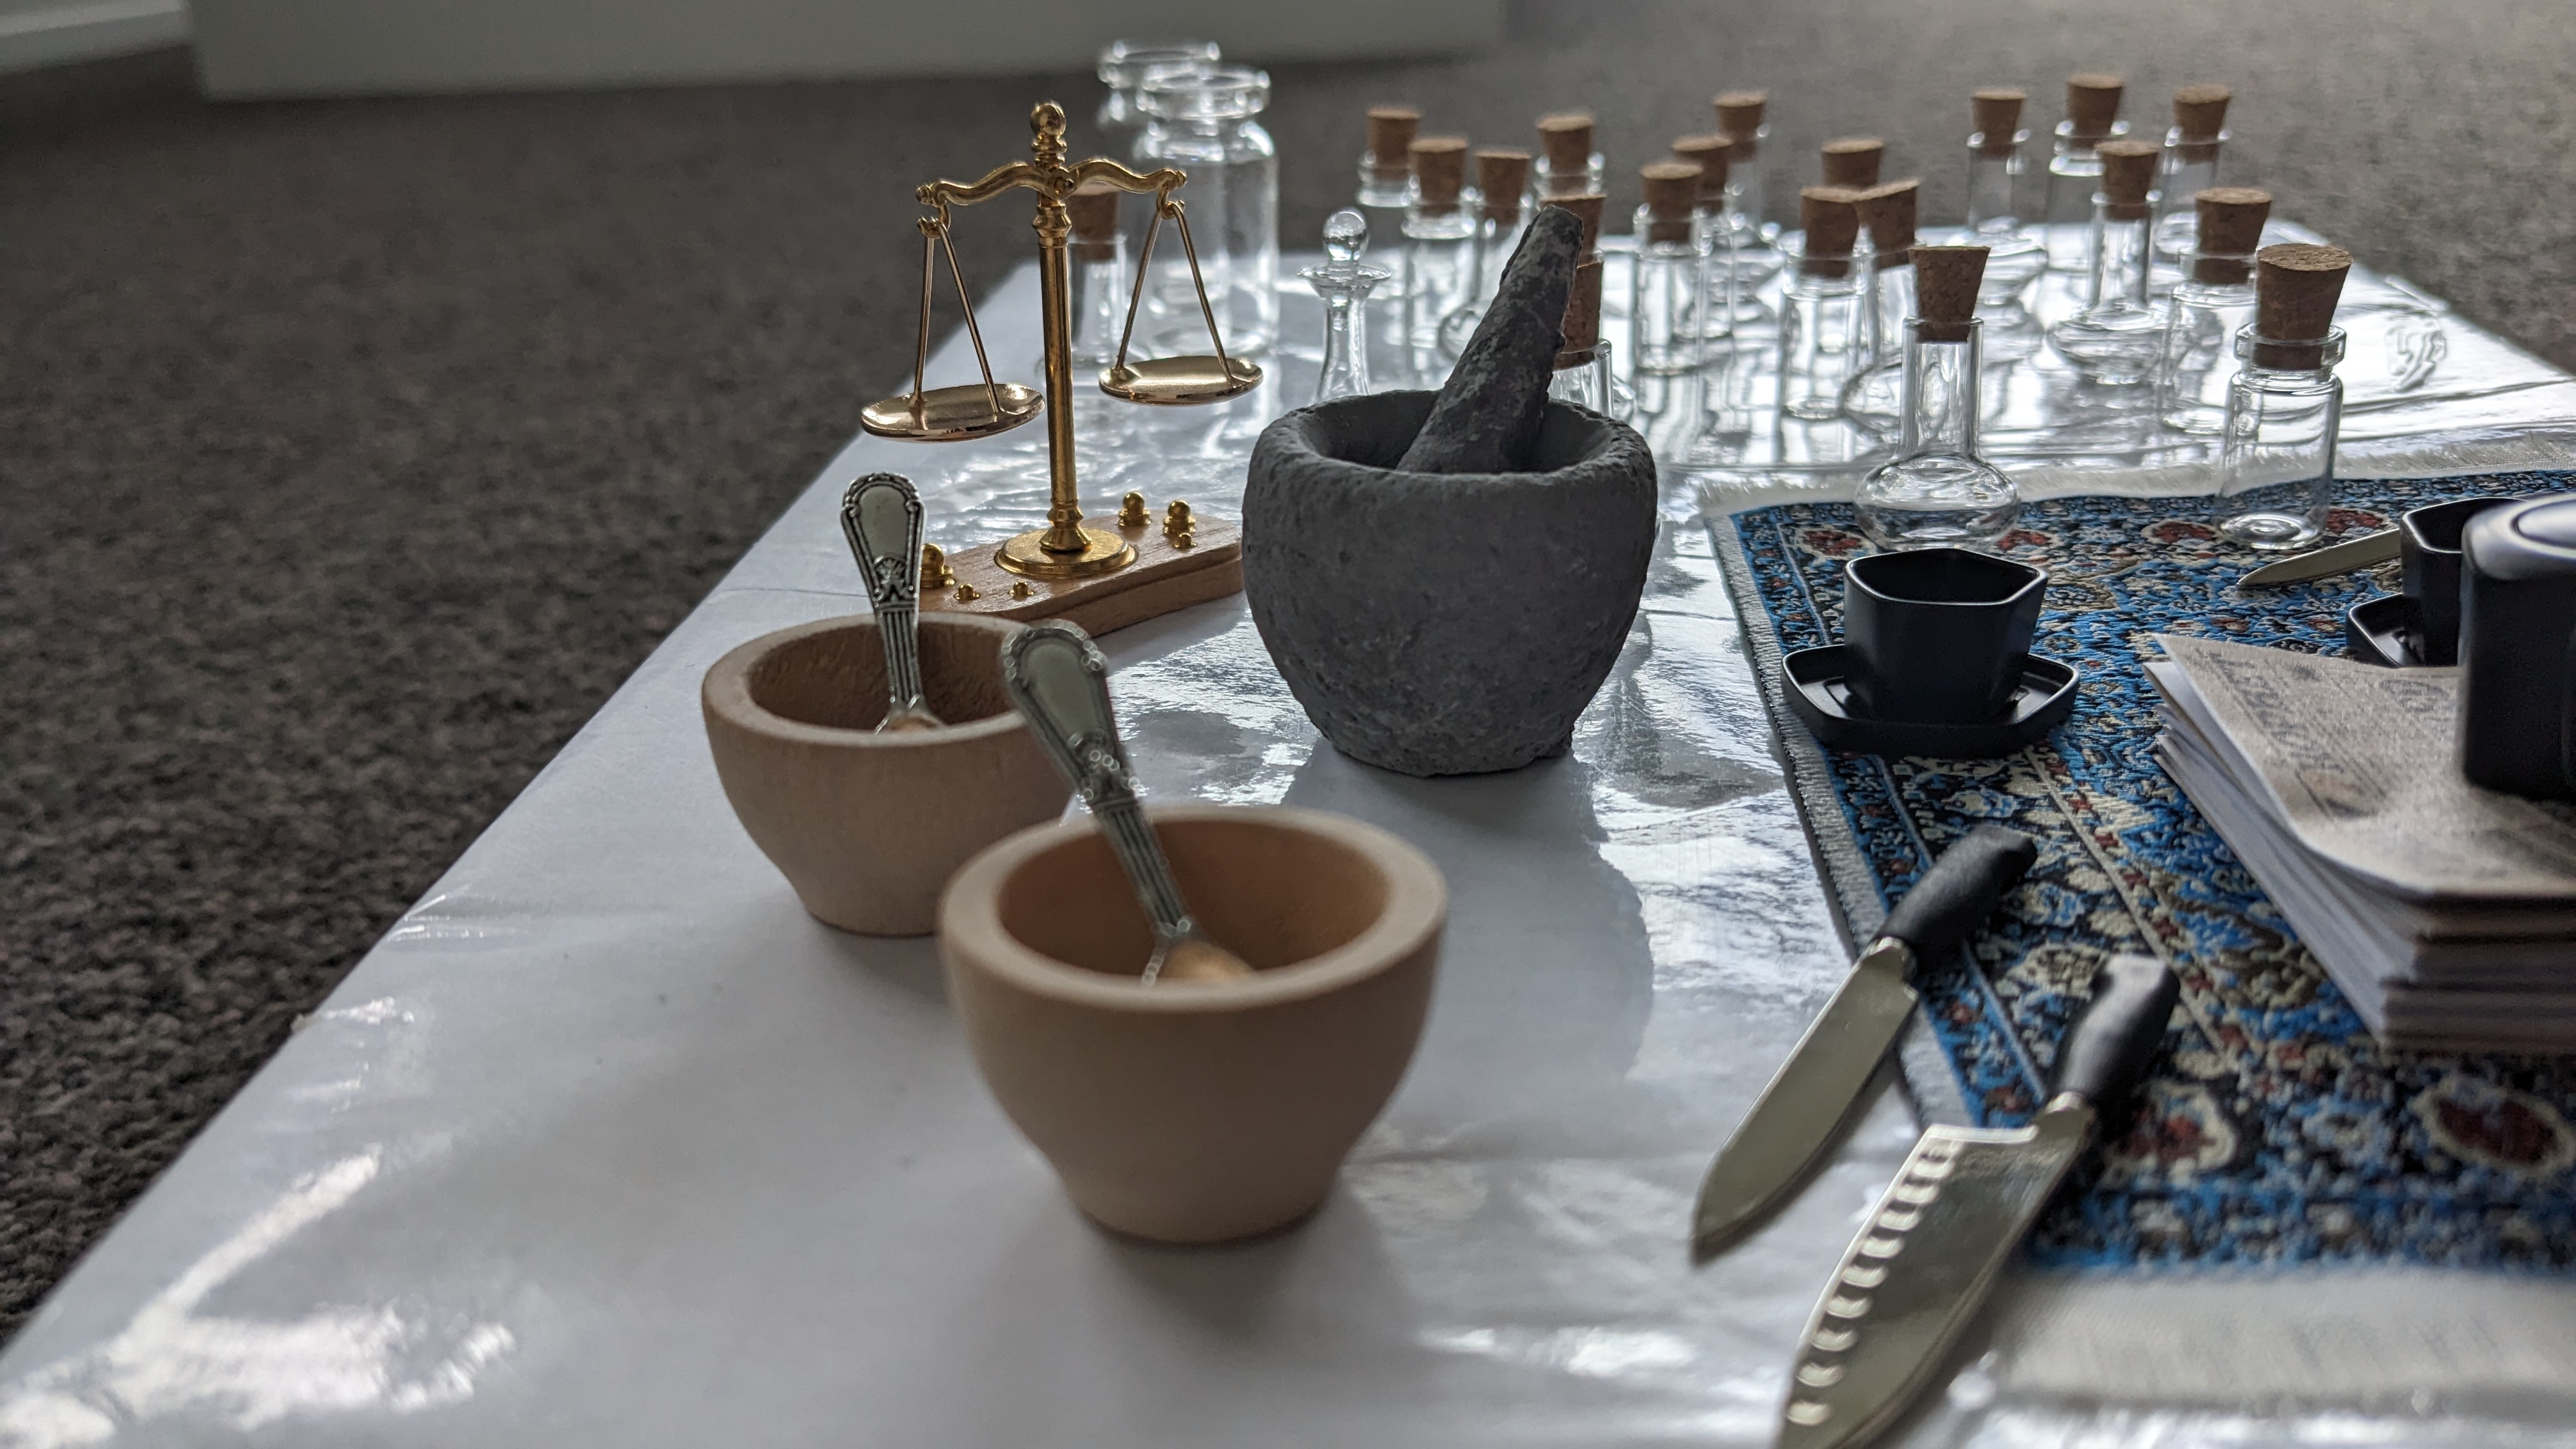
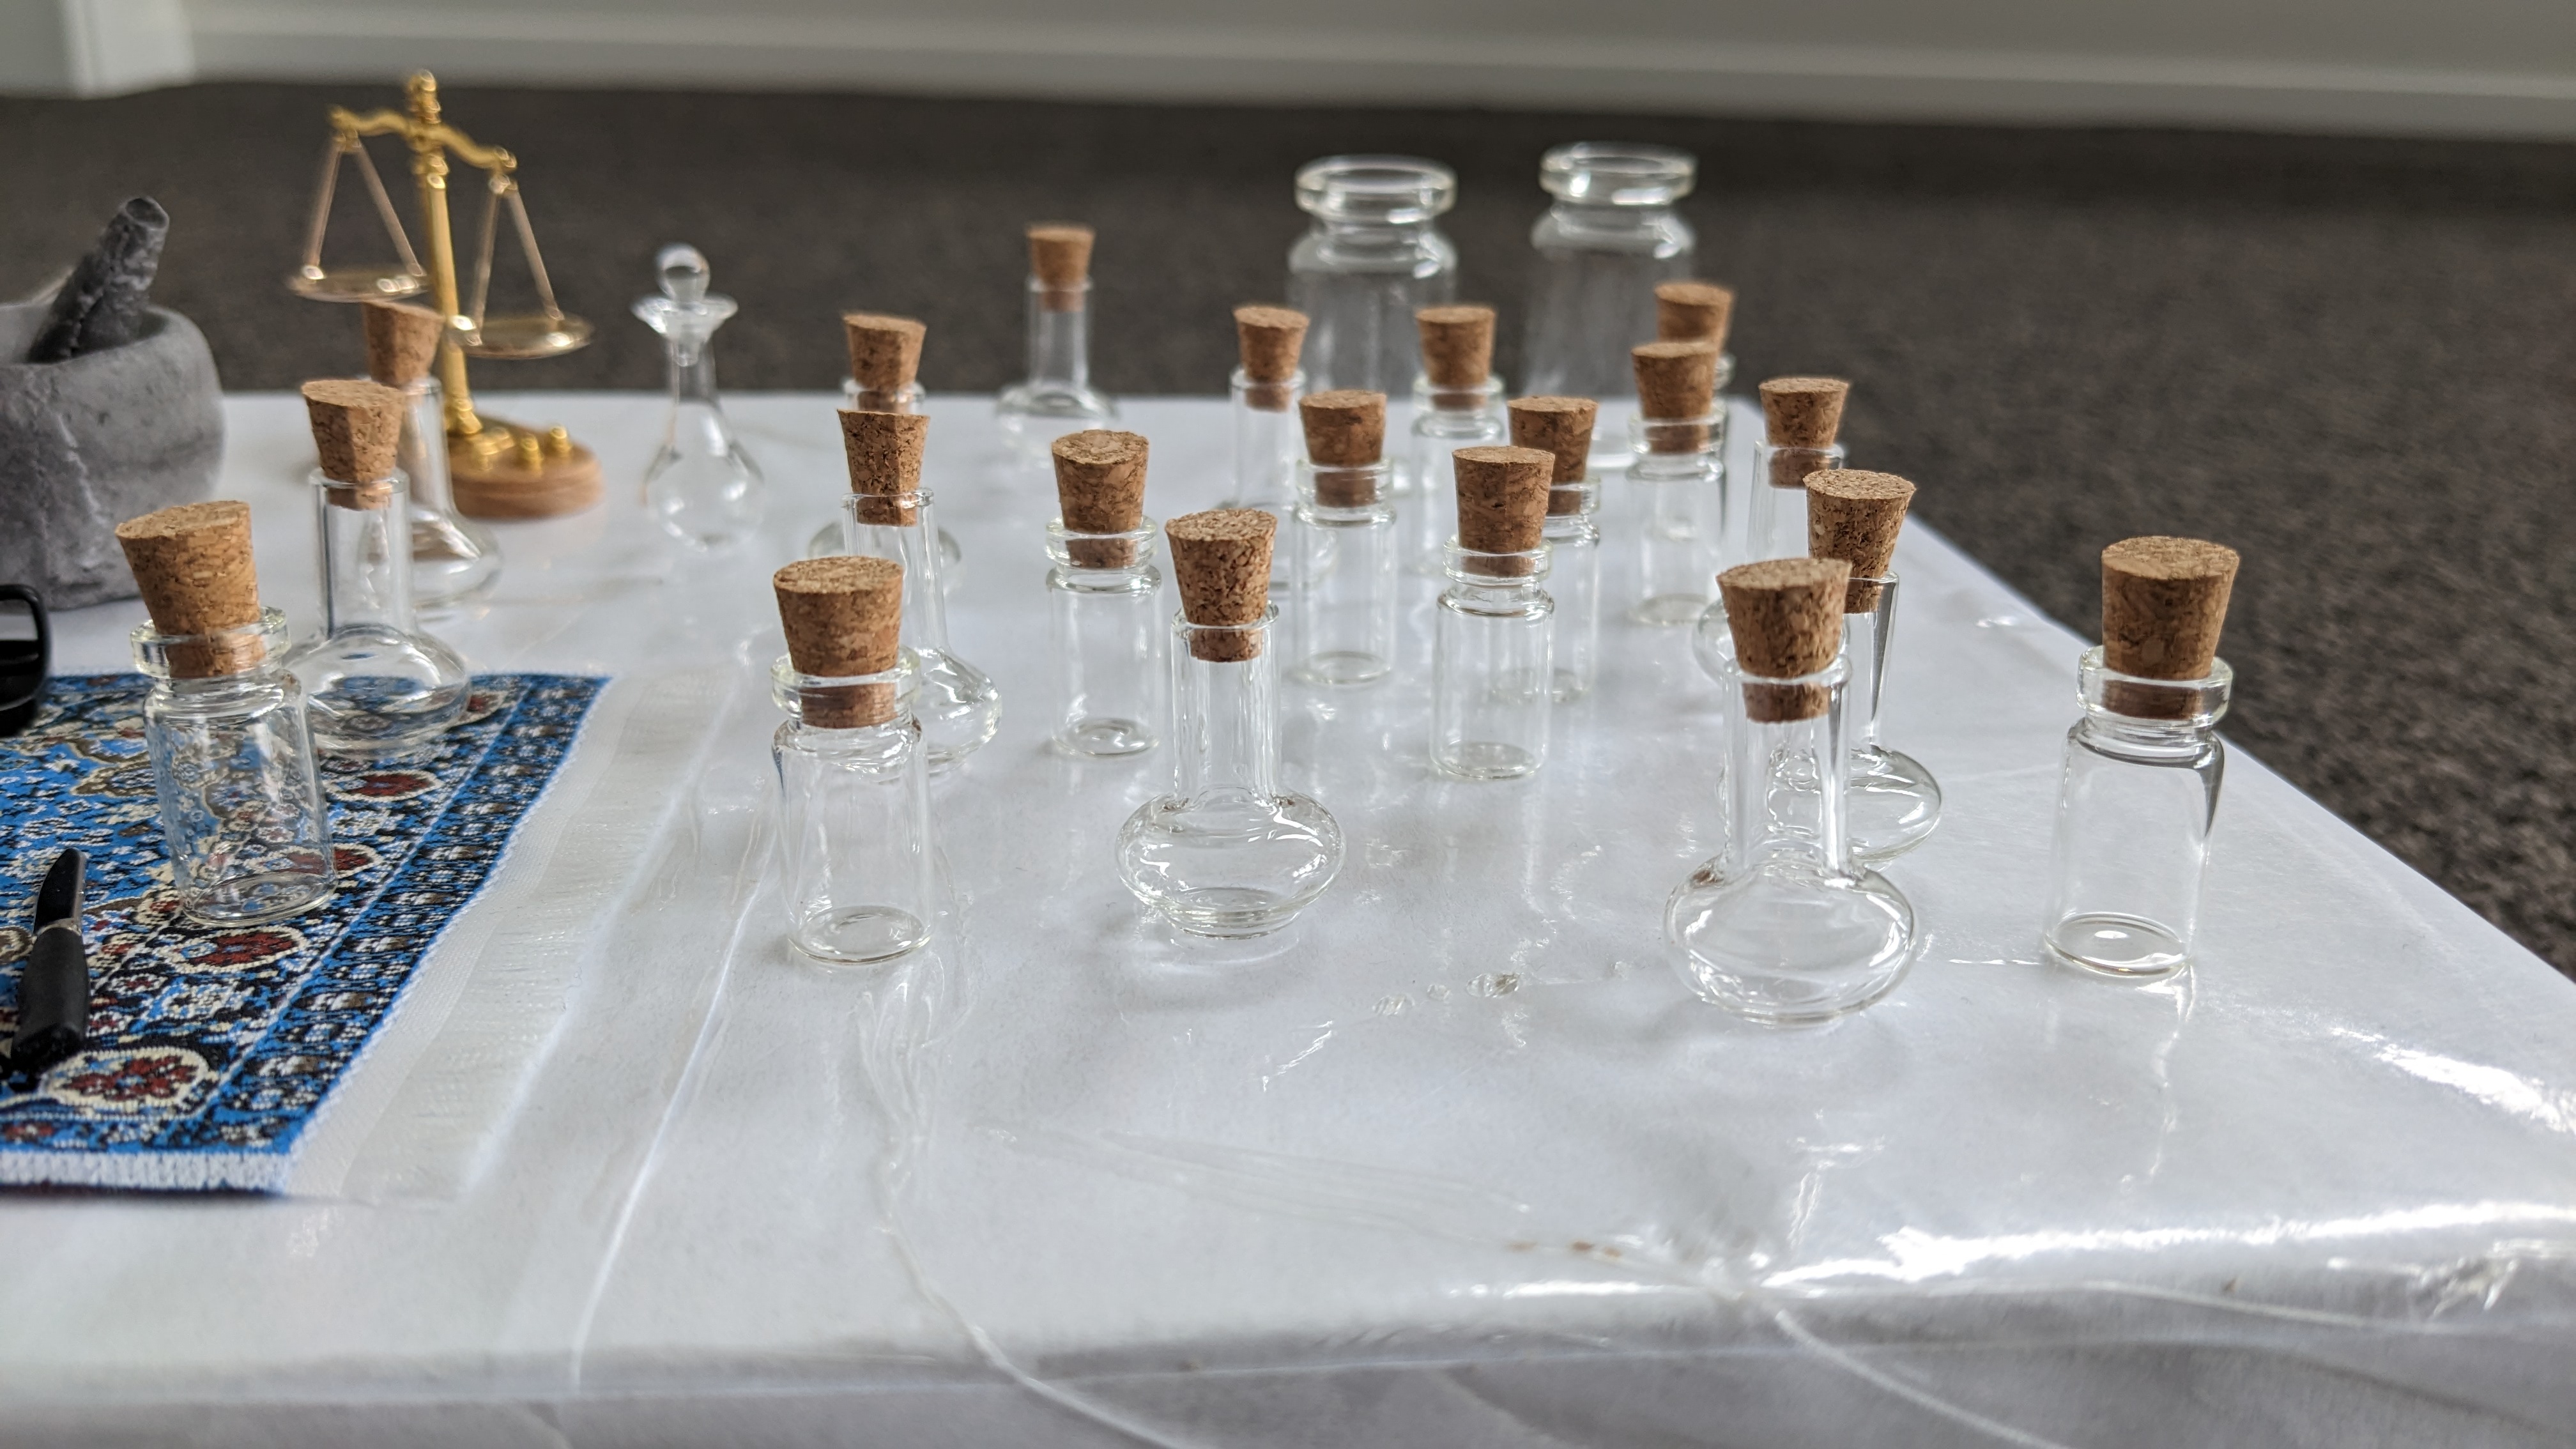
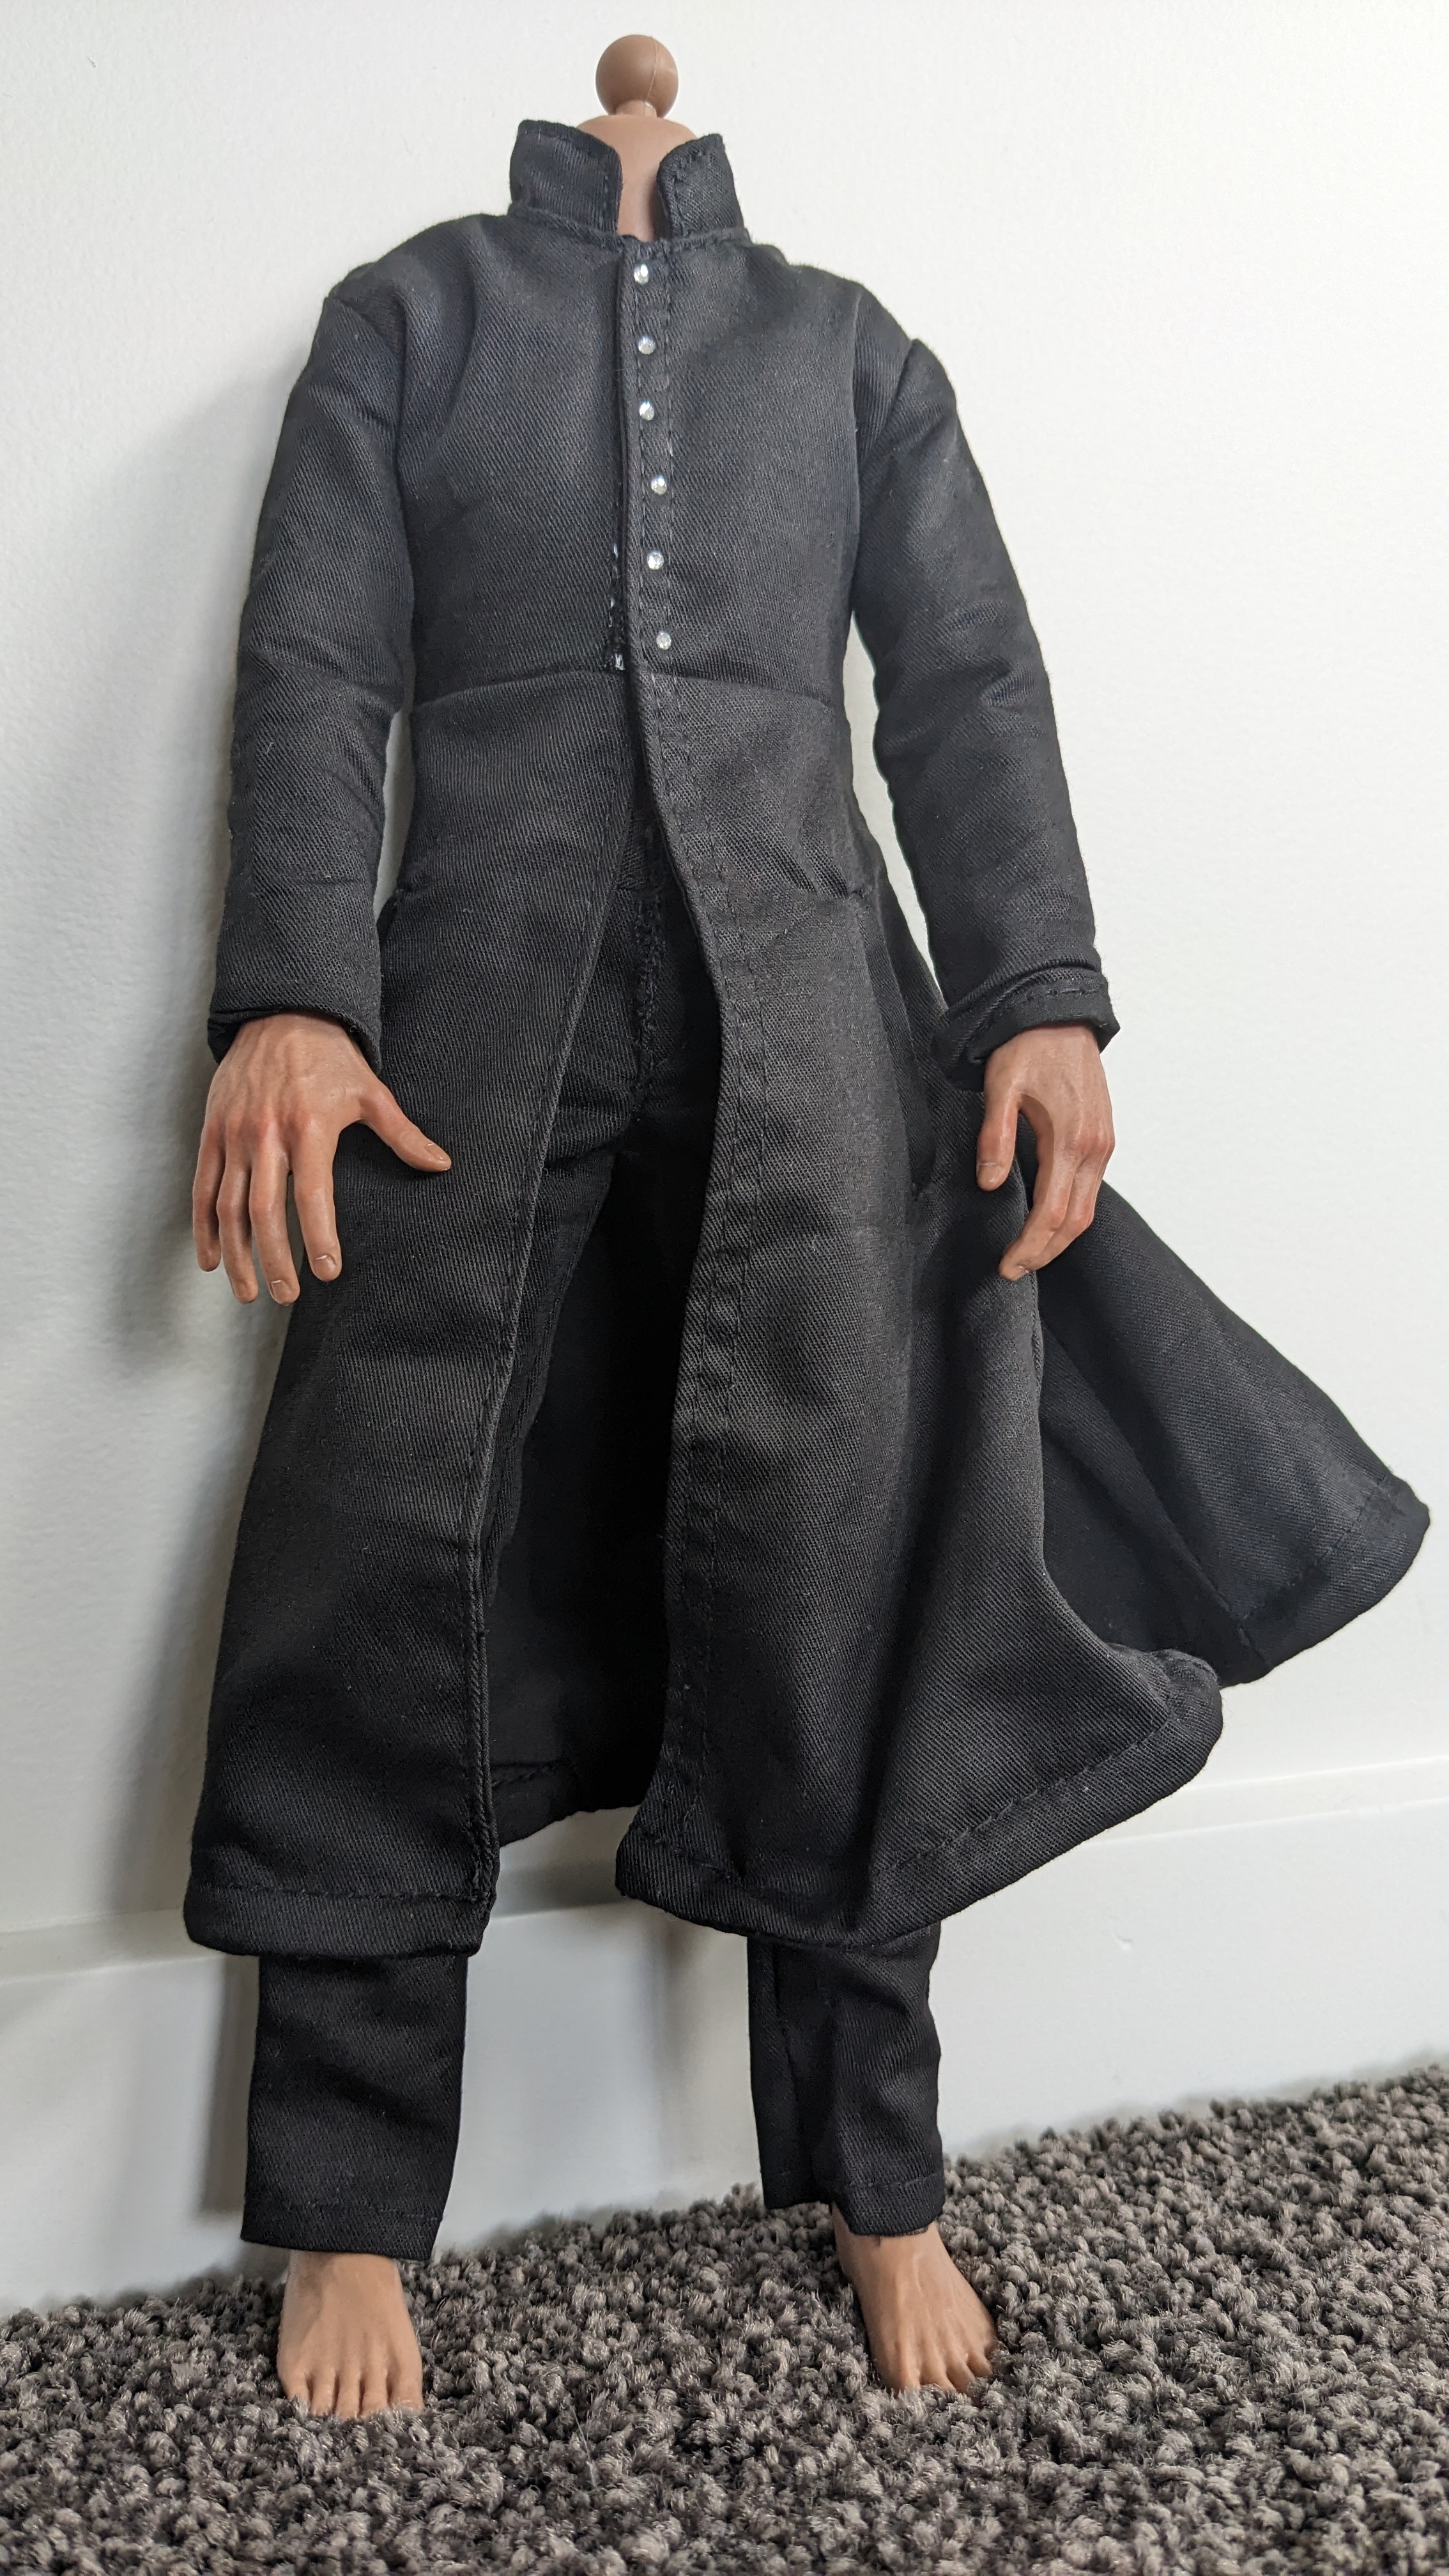
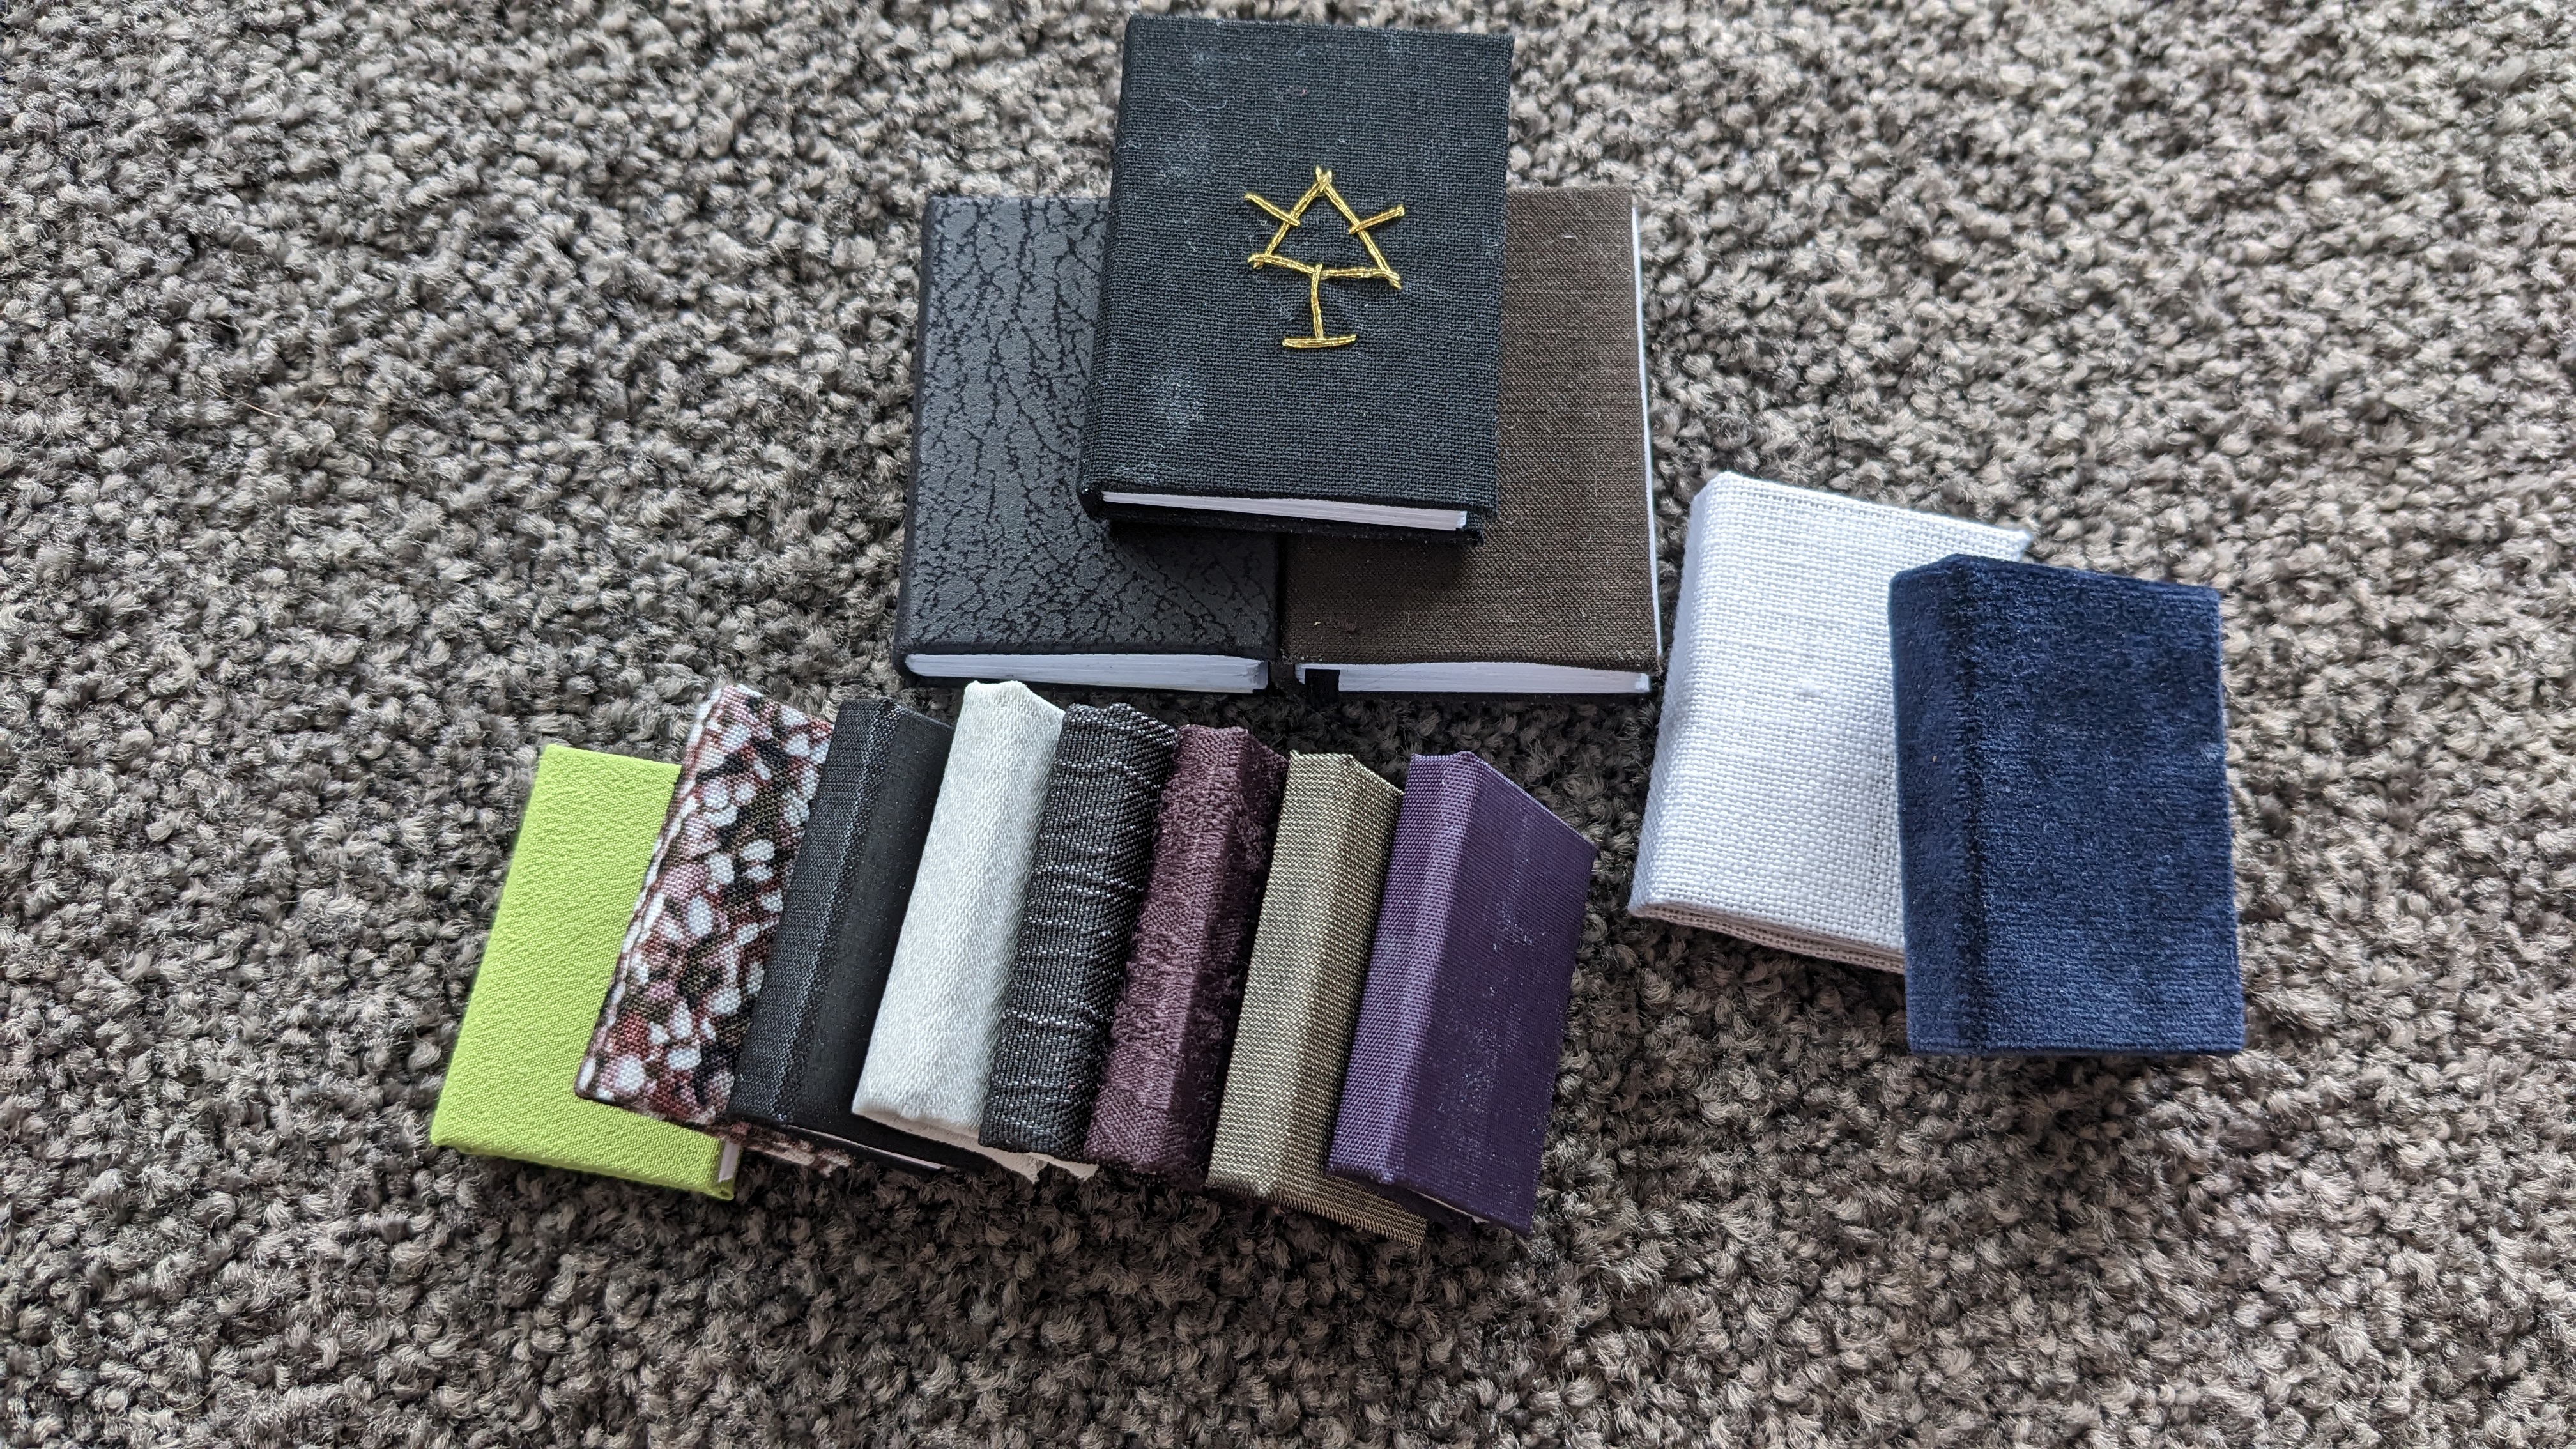
To start off, here's a few pictures of what I have so far - books, jars, and of course the action figure which I will be modding into Snape.
The books are all hand-made by me, I'm going to make lots more so when I do that I'll post some progress shots so you can see how I did it.
The jars I plan to fill with shapes and oil to make horrible potions ingredients. I'm planning to use iron filings and an electromagnet on a timer to make them wiggle, and I have some glow-in-the-dark pigments as well.
I do also have a plan for some floating candles using wireless LEDs on a breather circuit.
Anyway! Here are some photos!
Hello!
I'm so excited to share with you this project that I'm working on! I have cleared out a section of shelf in my closet and will be turning it into a mini potions lab and study for our favorite Potions Master.
I will be posting updates and progress here in this thread, so check back to see where I'm at! If you have any suggestions I'm keen to hear them as well. I'm a total amateur at miniatures, but I have a few handy skills so I'm hoping to do justice to the concept.
To start off, here's a few pictures of what I have so far - books, jars, and of course the action figure which I will be modding into Snape.
The books are all hand-made by me, I'm going to make lots more so when I do that I'll post some progress shots so you can see how I did it.
The jars I plan to fill with shapes and oil to make horrible potions ingredients. I'm planning to use iron filings and an electromagnet on a timer to make them wiggle, and I have some glow-in-the-dark pigments as well.
I do also have a plan for some floating candles using wireless LEDs on a breather circuit.
Anyway! Here are some photos!
Uploaded files:Quote from Heatherlly on December 18, 2022, 3:02 amWow, that looks AMAZING! My favorite part is the tiny books – would be really interested to know how to make those!
Wow, that looks AMAZING! My favorite part is the tiny books – would be really interested to know how to make those!
Quote from mmlf on December 20, 2022, 4:54 amThis is incredible. I would love to see this all lit with LEDs inside your closet when it's all finished. A greenish light would be great for Snape's house and his general vibe. (Pipecleaner snakes would be cool!) This is a very novel, independent concept of fan art, which I heartily approve of. Keep posting progress!
This is incredible. I would love to see this all lit with LEDs inside your closet when it's all finished. A greenish light would be great for Snape's house and his general vibe. (Pipecleaner snakes would be cool!) This is a very novel, independent concept of fan art, which I heartily approve of. Keep posting progress!
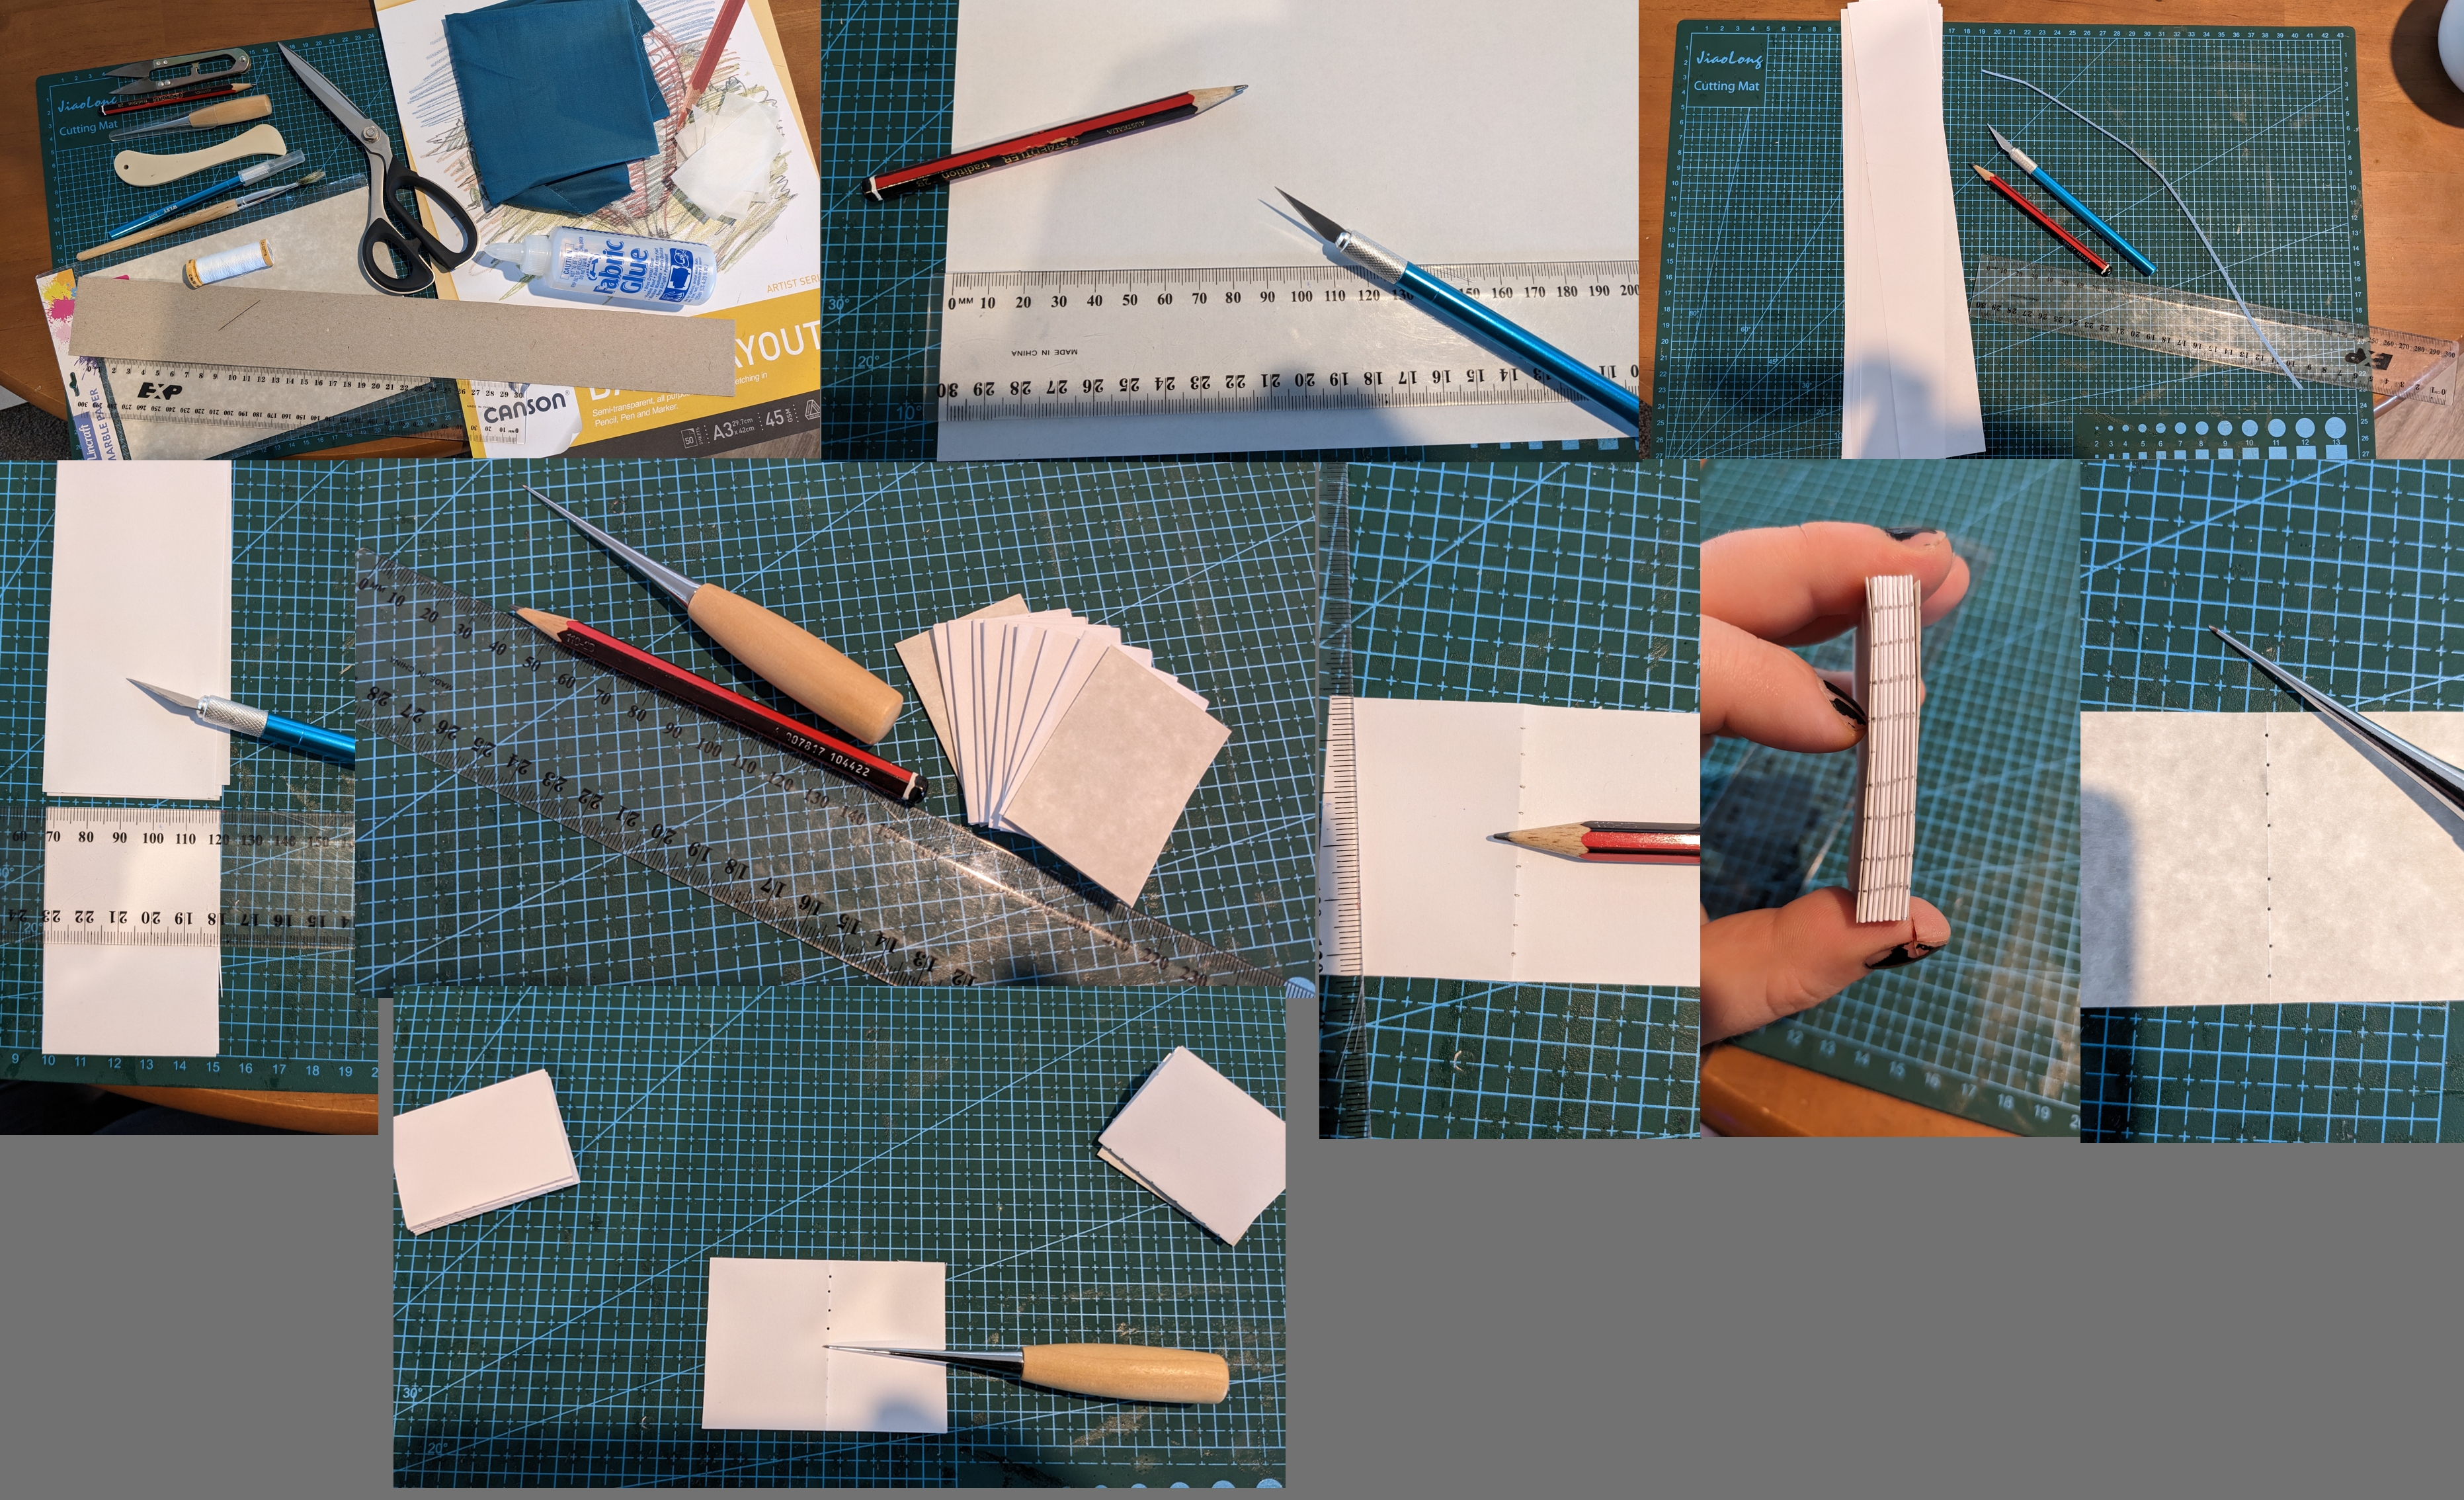
Quote from Logan on December 22, 2022, 3:23 amWow! Thanks so much for the kind words and encouragement! I have put together a few collages of images of making another tiny book and I'll do my best to explain what's happening for you.
The trick to tiny book making (for me) is that it's just book making, but tiny. I have made a few books before, so I'm basically just following that process but miniaturizing everything and skipping steps that would add bulk where I don't need the strength/durability that those steps give you.
First up, here's what you'll need. A lot of this can be substituted or fudged depending on the availability of your materials.
- Paper - I use Bank Layout because it's 45gsm which is thin enough that the pages aren't too bulky at scale.
- Wax paper for keeping tidy while gluing
- Card - I have 1.5mm bookboard here which may be hard to find. Any thick card will do.
- Fancy Cardstock - This is a 90gsm paper with a nice pattern, for your end papers.
- Fabric - woven, not knit. You want zero stretch, and preferably something which takes glue well.
- Fabric Glue - Flexible when dry, any kind is fine.
- Ruler
- Scissors - these are only for the fabric, so I use my fabric scissors
- Pencil
- Scalpel - you could get away with using scissors, but a scalpel is more accurate and easier for the boards.
- Awl or other pointy tool for poking holes in paper.
- Bone folder - this is totally optional, it's just for making nice creases when you fold the pages.
- Needle - standard size hand-sewing needle
- Thread - basic cotton thread is fine for miniatures
- Snips - for clipping the threads, optional
To start, you need to cut out your pages. Measure the height you want your book to be along the bottom of a page of bank layout and with the scalpel cut off that strip. Keep going until you've turned the whole sheet into strips as wide as your book will be tall. Tip: Keep the bank layout in the same orientation that the book will be, so short side on top and bottom, this will prevent warping.
Once you have your strips, align them all and measure twice the width of your book, then cut the strips into these double page pieces. If you use a ruler and scalpel you can cut them all at once.
I forgot to take a photo of this part, but now you need to fold your pages and make your signatures (which is the name for a collection of pages that get sewn together). Grab four little sheets, fold them in half with the short sides together and press the crease with the bone folder. Set these aside.
Take your fancy cardstock and cut out two double-page sized pieces from that. Fold them in half like your signatures. When you stack all your finished signatures together you should have one end page on the top of the stack, and one on the bottom.
Next you need to measure where your holes will go. Take one signature and flatten in out. Along the crease measure out your holes. I typically go 5mm in from each edge, then 5mm in from those holes. And then 5mm on either side of the centre of the book, and 5mm out from each of those holes. Tip: You can make the holes however you like and experiment here, but keep to an even number of holes. You want the string to always end on the same side of the page when you're sewing.
Once you've marked one signature, fold it back up, stack it with the others and then with your pencil, mark across all the spines of the signatures with a line to make sure you get the holes all in the same places. Tip: From this point on it is imperative to keep your signatures in the same order and orientation. Don't get confused or you will end up with a wonky book!
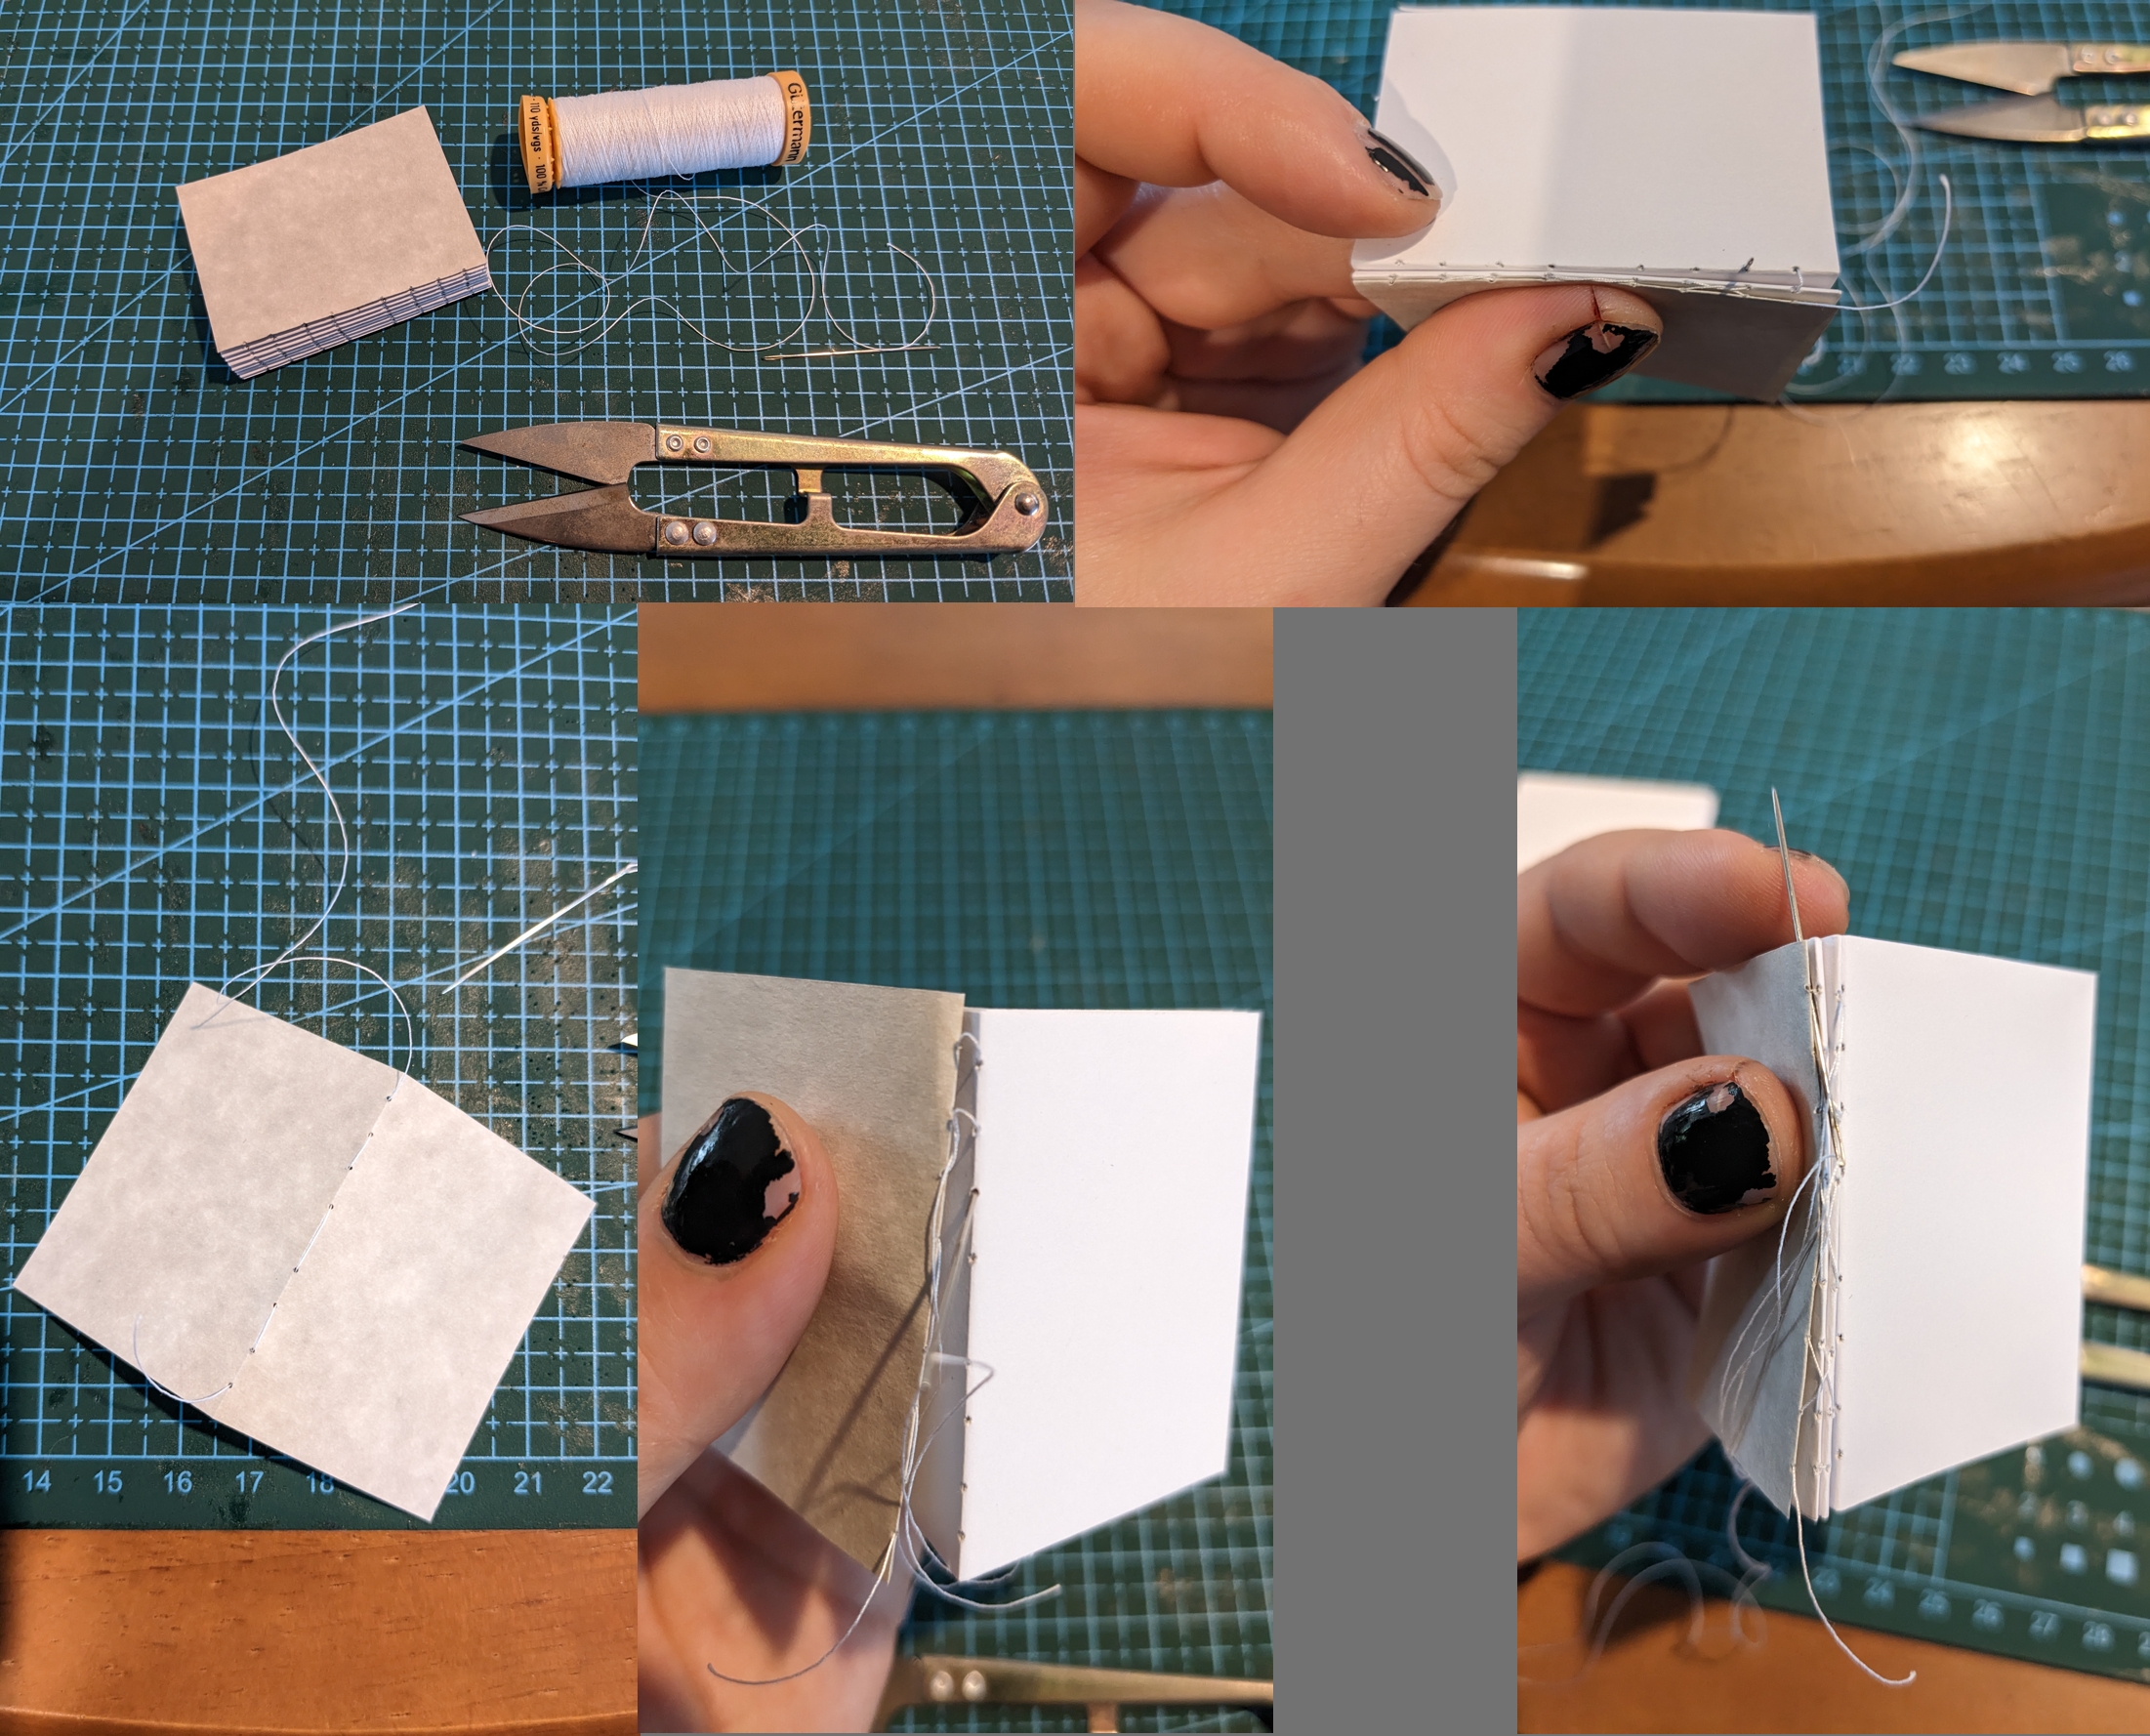
On to sewing! Thread your needle, you don't need a knot at the end of the thread, that tail will just dangle as you work. Don't let it pull through by clamping it with a finger, after you've done more than two signatures it won't pull anymore and you can leave it alone.
Decide on the bottom of your book and orient your stack of signatures, keep that orientation! Pick up the first end paper and from the outside thread the needle through the first hole. Go in and out through your holes until you reach the top. Once you have, grab the next signature and lay it against your end paper. Thread the needle into the top hold of that signature, then back out the next hole. Loop under the thread that sits along the spine of the previous signature and back into the next hole. Back out, loop under, back in. Repeat until you get to the last hole. For this first signature you will just grab the next one, lay it on, and repeat this whole process.
When you get to the last hole of your third signature, loop under the connecting thread between the first and second signatures before pushing through the first hole of the fourth signature. Tip: Keep your threads as tight as you can through this whole process to have a nice strong spine.
When you have finished sewing on your last signature, the end paper, finish it off by looping under the previous stitch between signatures and knotting the thread. Clip the end with a little tail.
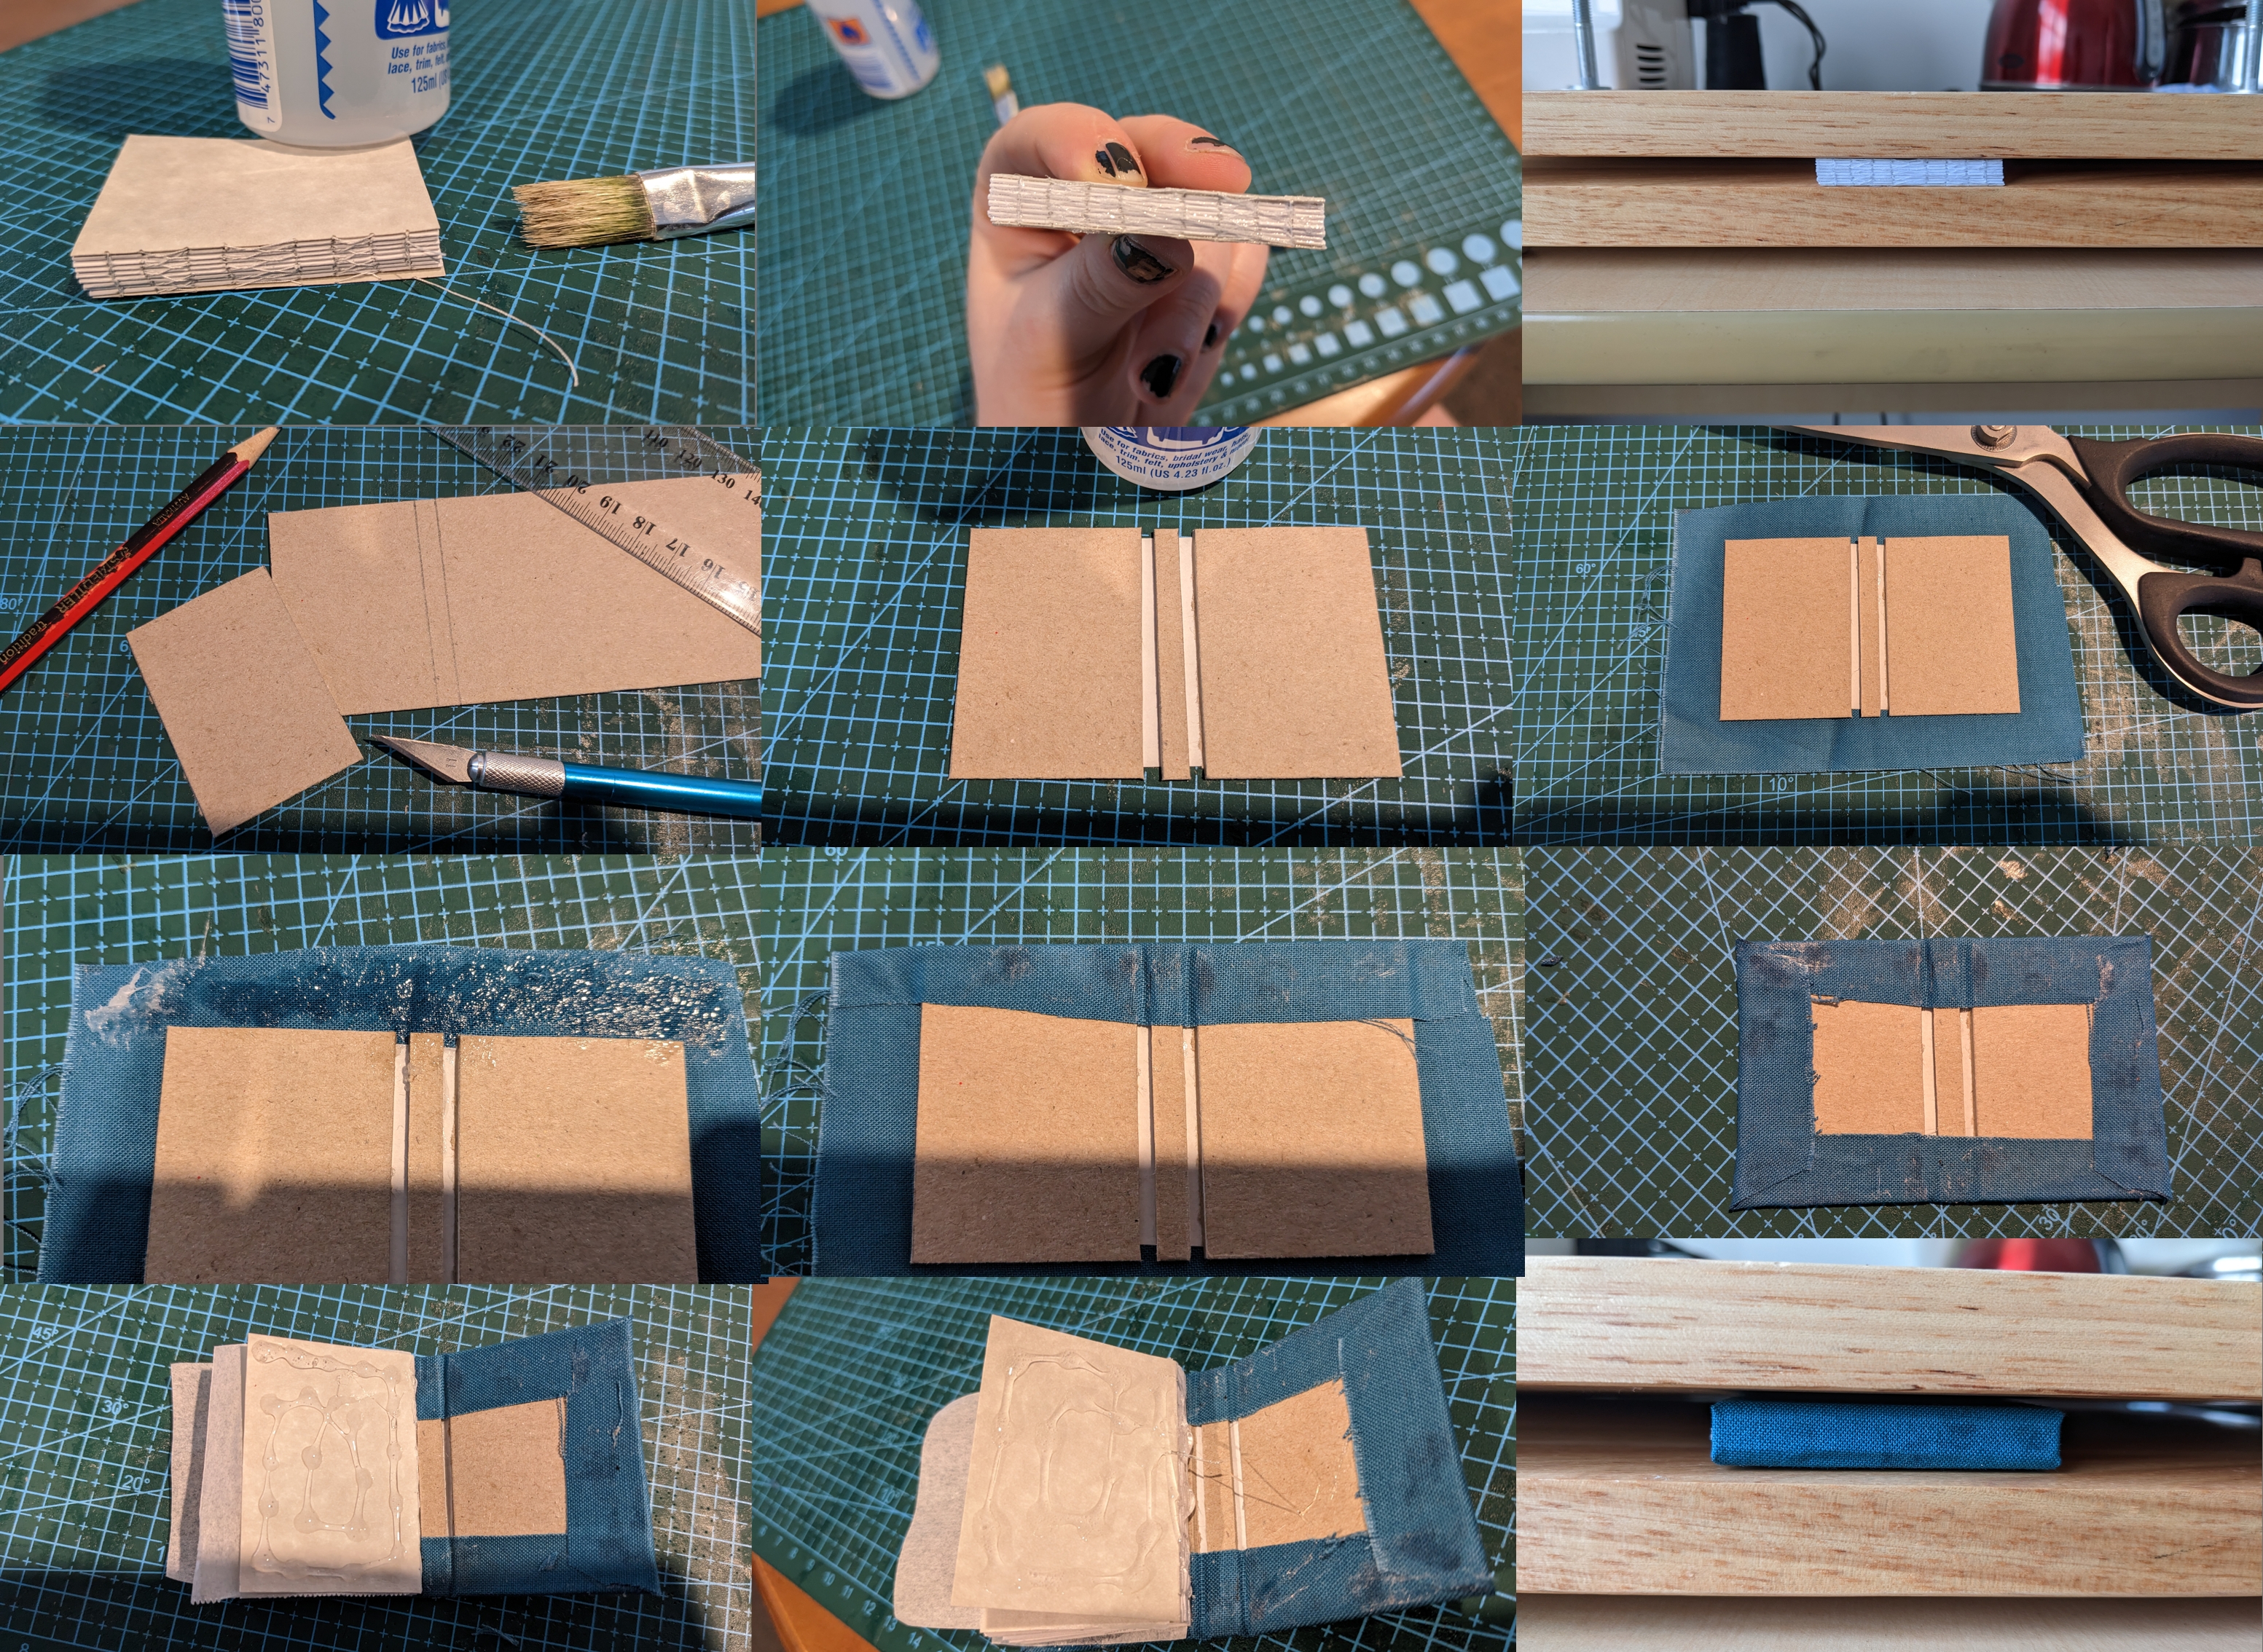
Now to glue. This bit can be messy, I use waxed paper to keep things neat.
Paint the edge of your spine with fabric glue and leave it to dry under some weight. I use my book press which is excessively overbuilt for these mini books. Just put your phone on it (with waxed paper!!), it's fine.
While the spine is drying we can work on the hard case. Get your bookboard and cut out three pieces. The two cover pieces should be approx 2mm taller than your book and 1mm wider than each page (Not the double page, just a single page width!) The third piece is a little spine stiffener, this should be around the width of your actual book spine so it will depend on how many pages you made. Mine is 5mm wide.
Take a piece of scrap bank layout from when you cut up your pages and glue the spine stiffener to it. Then glue on your boards. You want a gap of 1-2mm between them for the hinge. If you're nervous you can fit it around your glued up signature block to make sure you have the right amount of hinge.
Once you have this piece glued up, cut a piece of fabric with an allowance of around 1cm all around. Glue down your boards. At this point you should clip your corners. I forgot and had to peel up my glue to do it after I'd folded the edges already. You want to chop off a triangle from each corner about 1.5mm away from the corner of the board.
Now starting on the long sides, put glue on your allowance and fold it over your boards. Press right into all the creases and make sure the corners have sufficient glue. Next do the short sides. Tip: Once this is semi-dry, you can carefully clip some excess away from your corners for a smoother finish, but be careful you don't take too much and get exposed bookboard.
Leave this to dry under some weight and go collect your text block.
It doesn't need to be fully dry for the next stage. Put a piece of waxed paper between the end papers on each side of the text block. Starting on one side, fit the text block into the hard case and paint the outside of the endpaper with glue. Close the book and carefully open it a little and properly align your endpaper to the case so everything is square.
Flip the book over and do the same on the other side. Remember to put a little glue along the spine to fasten it to the stiffener.
Pop the whole thing under weight, leaving the little pieces of waxed paper in there until it's fully dry.
Congrats! you have a book!
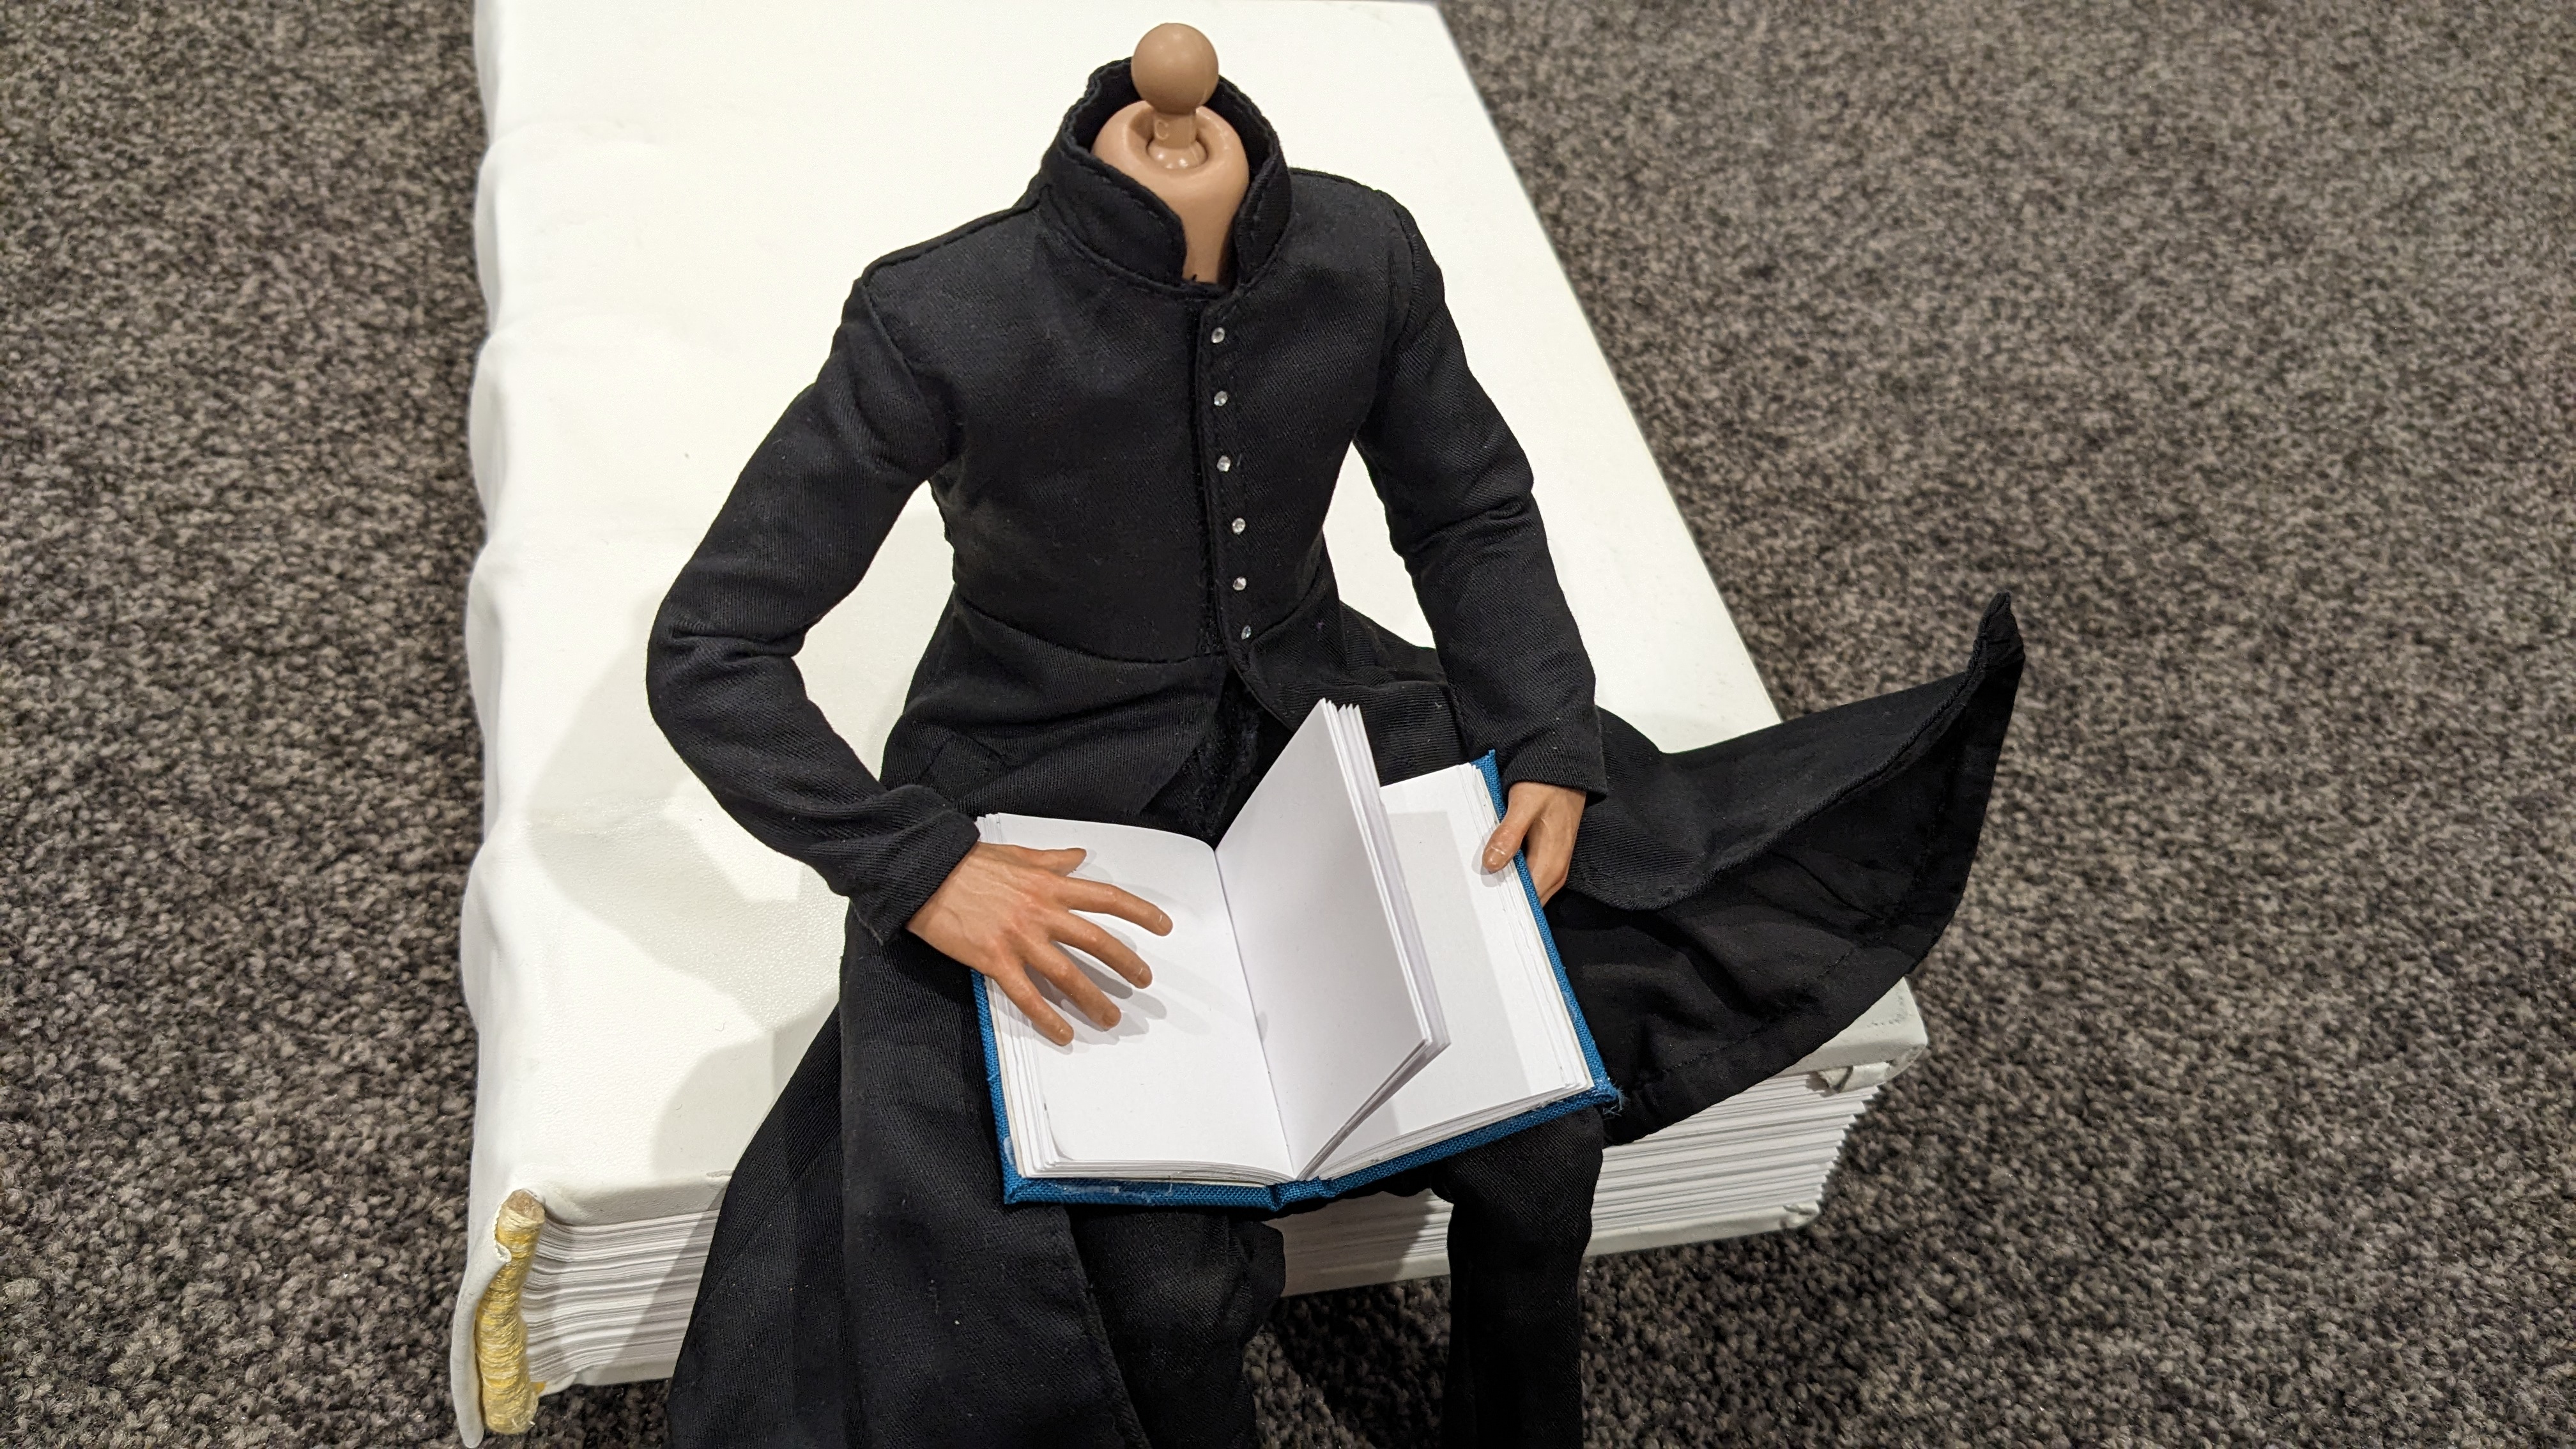
Measurements that I used are based on 1:6 scale of some of the books that I own. This example is a LARGE book, based on a behemoth I made in a medieval style with wooden covers. It's 5.2cm tall and 3.7cm wide. My mid sized books are 4.5cm x 3.1cm and the little ones are 3.9cm x 2.6cm - I can get two of the little books out of one sheet of the bank layout, so I will likely make most of them this size. Also they're adorable.
Final pic, headless mini!Snape sitting with his new book on the enormous tome that it's based on.
I have toyed with the idea of making one or two of these with actual words in them. I suspect that if I put in some effort I may be able to print a page with teeny book layout pages on it.... If I had a decent reference text that would make sense for his lab I may make the effort. Or just freehand some alchemical symbologies onto one full spread of pages and stick the book open to that... Who knows!
Wow! Thanks so much for the kind words and encouragement! I have put together a few collages of images of making another tiny book and I'll do my best to explain what's happening for you.
The trick to tiny book making (for me) is that it's just book making, but tiny. I have made a few books before, so I'm basically just following that process but miniaturizing everything and skipping steps that would add bulk where I don't need the strength/durability that those steps give you.
First up, here's what you'll need. A lot of this can be substituted or fudged depending on the availability of your materials.
- Paper - I use Bank Layout because it's 45gsm which is thin enough that the pages aren't too bulky at scale.
- Wax paper for keeping tidy while gluing
- Card - I have 1.5mm bookboard here which may be hard to find. Any thick card will do.
- Fancy Cardstock - This is a 90gsm paper with a nice pattern, for your end papers.
- Fabric - woven, not knit. You want zero stretch, and preferably something which takes glue well.
- Fabric Glue - Flexible when dry, any kind is fine.
- Ruler
- Scissors - these are only for the fabric, so I use my fabric scissors
- Pencil
- Scalpel - you could get away with using scissors, but a scalpel is more accurate and easier for the boards.
- Awl or other pointy tool for poking holes in paper.
- Bone folder - this is totally optional, it's just for making nice creases when you fold the pages.
- Needle - standard size hand-sewing needle
- Thread - basic cotton thread is fine for miniatures
- Snips - for clipping the threads, optional
To start, you need to cut out your pages. Measure the height you want your book to be along the bottom of a page of bank layout and with the scalpel cut off that strip. Keep going until you've turned the whole sheet into strips as wide as your book will be tall. Tip: Keep the bank layout in the same orientation that the book will be, so short side on top and bottom, this will prevent warping.
Once you have your strips, align them all and measure twice the width of your book, then cut the strips into these double page pieces. If you use a ruler and scalpel you can cut them all at once.
I forgot to take a photo of this part, but now you need to fold your pages and make your signatures (which is the name for a collection of pages that get sewn together). Grab four little sheets, fold them in half with the short sides together and press the crease with the bone folder. Set these aside.
Take your fancy cardstock and cut out two double-page sized pieces from that. Fold them in half like your signatures. When you stack all your finished signatures together you should have one end page on the top of the stack, and one on the bottom.
Next you need to measure where your holes will go. Take one signature and flatten in out. Along the crease measure out your holes. I typically go 5mm in from each edge, then 5mm in from those holes. And then 5mm on either side of the centre of the book, and 5mm out from each of those holes. Tip: You can make the holes however you like and experiment here, but keep to an even number of holes. You want the string to always end on the same side of the page when you're sewing.
Once you've marked one signature, fold it back up, stack it with the others and then with your pencil, mark across all the spines of the signatures with a line to make sure you get the holes all in the same places. Tip: From this point on it is imperative to keep your signatures in the same order and orientation. Don't get confused or you will end up with a wonky book!
On to sewing! Thread your needle, you don't need a knot at the end of the thread, that tail will just dangle as you work. Don't let it pull through by clamping it with a finger, after you've done more than two signatures it won't pull anymore and you can leave it alone.
Decide on the bottom of your book and orient your stack of signatures, keep that orientation! Pick up the first end paper and from the outside thread the needle through the first hole. Go in and out through your holes until you reach the top. Once you have, grab the next signature and lay it against your end paper. Thread the needle into the top hold of that signature, then back out the next hole. Loop under the thread that sits along the spine of the previous signature and back into the next hole. Back out, loop under, back in. Repeat until you get to the last hole. For this first signature you will just grab the next one, lay it on, and repeat this whole process.
When you get to the last hole of your third signature, loop under the connecting thread between the first and second signatures before pushing through the first hole of the fourth signature. Tip: Keep your threads as tight as you can through this whole process to have a nice strong spine.
When you have finished sewing on your last signature, the end paper, finish it off by looping under the previous stitch between signatures and knotting the thread. Clip the end with a little tail.
Now to glue. This bit can be messy, I use waxed paper to keep things neat.
Paint the edge of your spine with fabric glue and leave it to dry under some weight. I use my book press which is excessively overbuilt for these mini books. Just put your phone on it (with waxed paper!!), it's fine.
While the spine is drying we can work on the hard case. Get your bookboard and cut out three pieces. The two cover pieces should be approx 2mm taller than your book and 1mm wider than each page (Not the double page, just a single page width!) The third piece is a little spine stiffener, this should be around the width of your actual book spine so it will depend on how many pages you made. Mine is 5mm wide.
Take a piece of scrap bank layout from when you cut up your pages and glue the spine stiffener to it. Then glue on your boards. You want a gap of 1-2mm between them for the hinge. If you're nervous you can fit it around your glued up signature block to make sure you have the right amount of hinge.
Once you have this piece glued up, cut a piece of fabric with an allowance of around 1cm all around. Glue down your boards. At this point you should clip your corners. I forgot and had to peel up my glue to do it after I'd folded the edges already. You want to chop off a triangle from each corner about 1.5mm away from the corner of the board.
Now starting on the long sides, put glue on your allowance and fold it over your boards. Press right into all the creases and make sure the corners have sufficient glue. Next do the short sides. Tip: Once this is semi-dry, you can carefully clip some excess away from your corners for a smoother finish, but be careful you don't take too much and get exposed bookboard.
Leave this to dry under some weight and go collect your text block.
It doesn't need to be fully dry for the next stage. Put a piece of waxed paper between the end papers on each side of the text block. Starting on one side, fit the text block into the hard case and paint the outside of the endpaper with glue. Close the book and carefully open it a little and properly align your endpaper to the case so everything is square.
Flip the book over and do the same on the other side. Remember to put a little glue along the spine to fasten it to the stiffener.
Pop the whole thing under weight, leaving the little pieces of waxed paper in there until it's fully dry.
Congrats! you have a book!
Measurements that I used are based on 1:6 scale of some of the books that I own. This example is a LARGE book, based on a behemoth I made in a medieval style with wooden covers. It's 5.2cm tall and 3.7cm wide. My mid sized books are 4.5cm x 3.1cm and the little ones are 3.9cm x 2.6cm - I can get two of the little books out of one sheet of the bank layout, so I will likely make most of them this size. Also they're adorable.
Final pic, headless mini!Snape sitting with his new book on the enormous tome that it's based on.
I have toyed with the idea of making one or two of these with actual words in them. I suspect that if I put in some effort I may be able to print a page with teeny book layout pages on it.... If I had a decent reference text that would make sense for his lab I may make the effort. Or just freehand some alchemical symbologies onto one full spread of pages and stick the book open to that... Who knows!
Uploaded files:Quote from Logan on January 6, 2023, 8:45 pmI have figured out how to put text into my books! Hurrah!
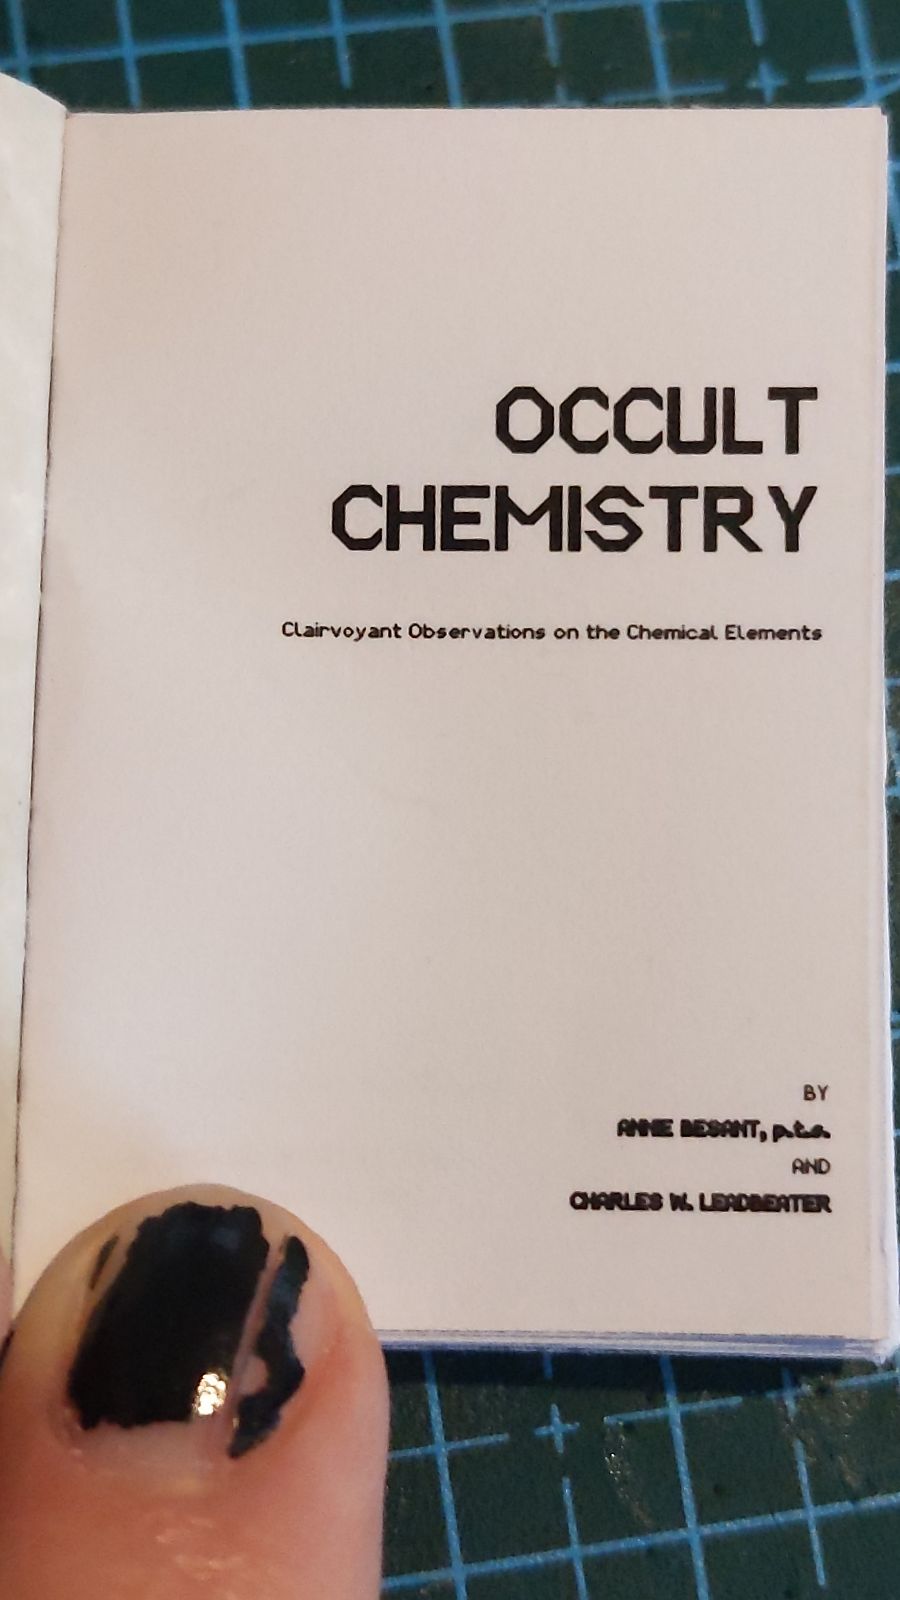
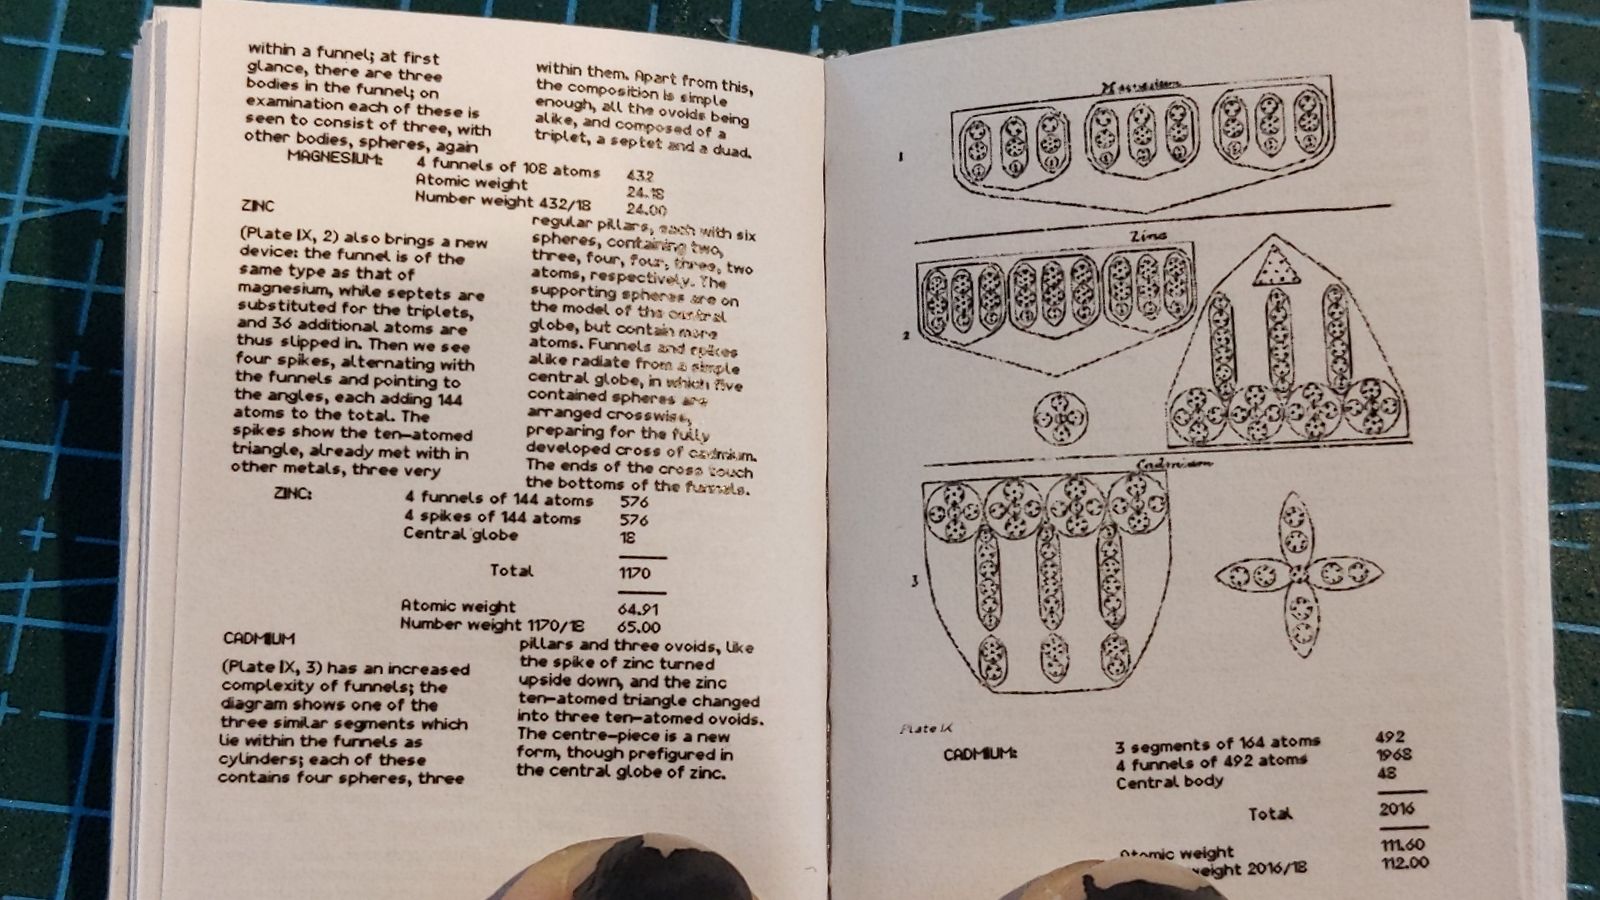
Using this program here I was able to print out texts in a super tiny format, and have found a really cool text that I'm binding. It's called 'Occult Chemistry' and you can read it on project Gutenberg which is where I get all my texts. It was printed in 1919 and it is WILD. Definitely a great book for a nerd-wizard like Snape. I spent a good 6 or so hours reformatting it for print, but I think it turned out really nice.
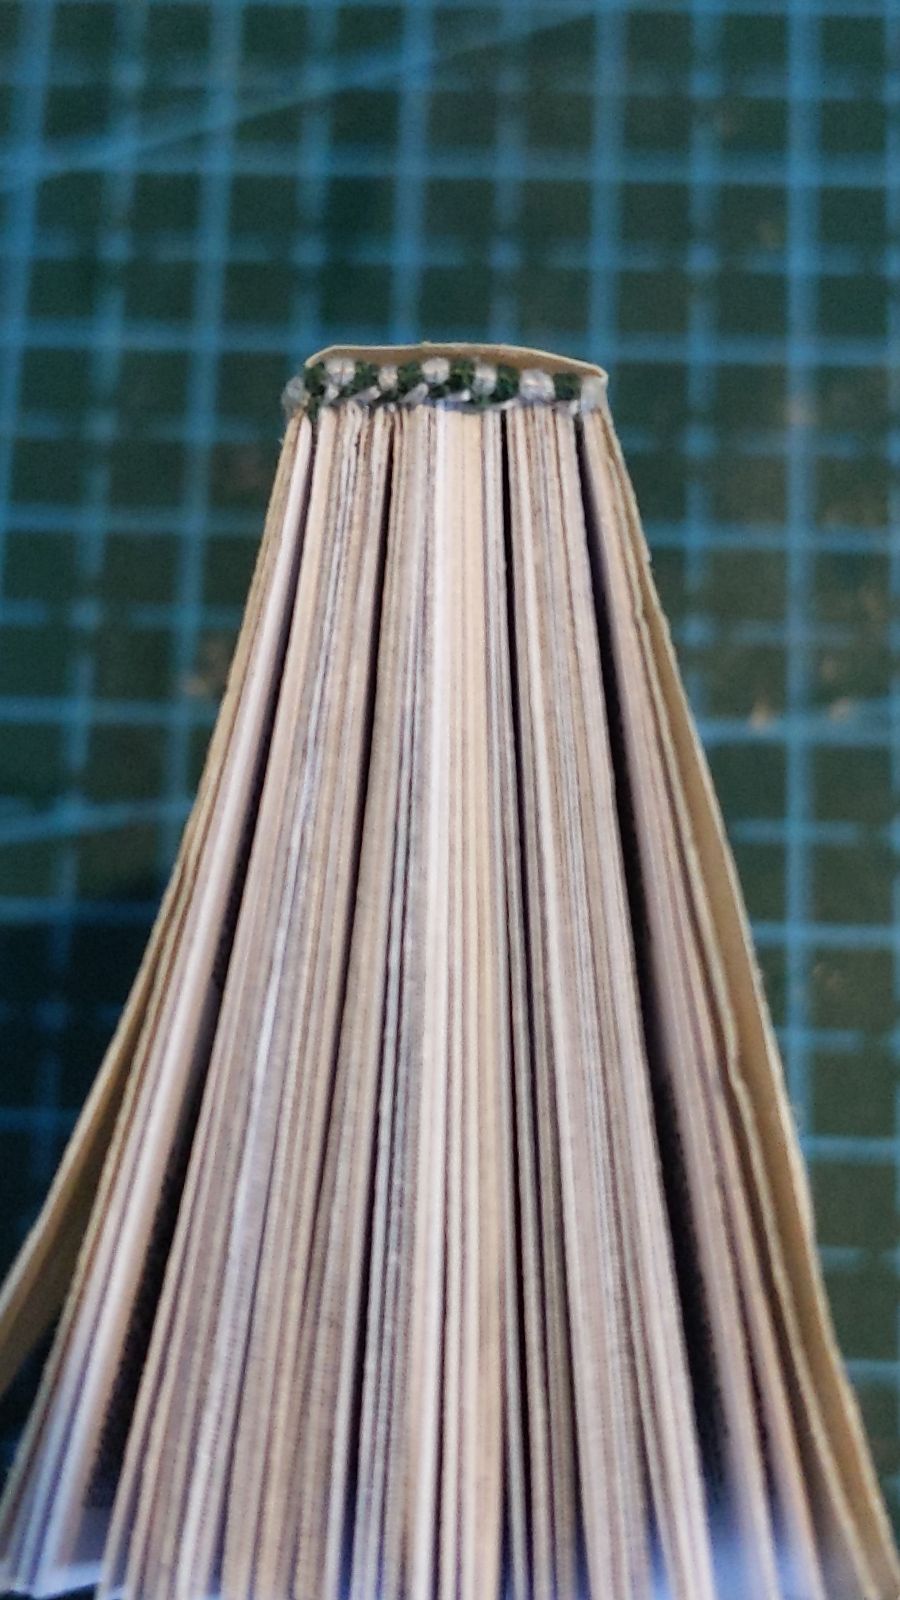
I also added headbands to this one and I'm pleased with how they turned out. Here's some pics, I'm so pleased with this little book! I've ordered some gold and silver pens that I'm planning to use to adorn the cover too, as I'm finding the plain cloth bindings a little plain.
Next, I'm working on getting a good pattern together for the armchair. The one that I had is a liiiiiitle small for the figure I'm working with, so I'm going to scale it up a little. My green leather arrived, but I'm going to make one from duckcloth first to get the process right before I cut into that.
I have a few other texts done, a biological compendium of Norfolk plants in Latin which I stuffed up the margins on so I may re-print a better version, and a few pamphlet size ones on anatomy and medicine in Latin as well. I will probably do a few more if I can find some good texts to use. If anyone has anything alchemical or magic related I would love to get my hands on it. I'd prefer not to use anything that people currently genuinely believe in though, just as a rule.
Let me know what you think!
I have figured out how to put text into my books! Hurrah!
Using this program here I was able to print out texts in a super tiny format, and have found a really cool text that I'm binding. It's called 'Occult Chemistry' and you can read it on project Gutenberg which is where I get all my texts. It was printed in 1919 and it is WILD. Definitely a great book for a nerd-wizard like Snape. I spent a good 6 or so hours reformatting it for print, but I think it turned out really nice.
I also added headbands to this one and I'm pleased with how they turned out. Here's some pics, I'm so pleased with this little book! I've ordered some gold and silver pens that I'm planning to use to adorn the cover too, as I'm finding the plain cloth bindings a little plain.
Next, I'm working on getting a good pattern together for the armchair. The one that I had is a liiiiiitle small for the figure I'm working with, so I'm going to scale it up a little. My green leather arrived, but I'm going to make one from duckcloth first to get the process right before I cut into that.
I have a few other texts done, a biological compendium of Norfolk plants in Latin which I stuffed up the margins on so I may re-print a better version, and a few pamphlet size ones on anatomy and medicine in Latin as well. I will probably do a few more if I can find some good texts to use. If anyone has anything alchemical or magic related I would love to get my hands on it. I'd prefer not to use anything that people currently genuinely believe in though, just as a rule.
Let me know what you think!
Uploaded files:Quote from Heatherlly on January 7, 2023, 1:41 amThat is AMAZING! Seriously, I'm in awe of your patients, hard work, and attention to detail.
In the future, you might want to look into creating other miniatures from books in the public domain. Not only would they make amazing gifts, but I bet they'd sell really well on Etsy.
Please keep sharing your progress! This truly is fascinating.
That is AMAZING! Seriously, I'm in awe of your patients, hard work, and attention to detail.
In the future, you might want to look into creating other miniatures from books in the public domain. Not only would they make amazing gifts, but I bet they'd sell really well on Etsy.
Please keep sharing your progress! This truly is fascinating.
Quote from mmlf on January 9, 2023, 7:37 amThis is astonishing, Logan! Occult chemistry sounds like something I would read anyway. I thinkt he gold and silver pens for the cloth covers is a great idea. Do you think you would do some kind of calligraphic font on them?
This is astonishing, Logan! Occult chemistry sounds like something I would read anyway. I thinkt he gold and silver pens for the cloth covers is a great idea. Do you think you would do some kind of calligraphic font on them?
Quote from Logan on February 6, 2023, 10:46 pmOh yeah calligraphy on the covers would be awesome! It will be hard though, the pens I bought are 0.7mm which is about the smallest they sell, and while they have a great ink flow which shows up nice on the covers (much better than the gold sharpie I used on the first couple), there's really no way to get the kinds of calligraphy you can get using a wedge or plate tipped pen. I'd have to have a think about that. I considered using paint and then either calligraphy nibs or just a flat piece of plastic or wood to paint...
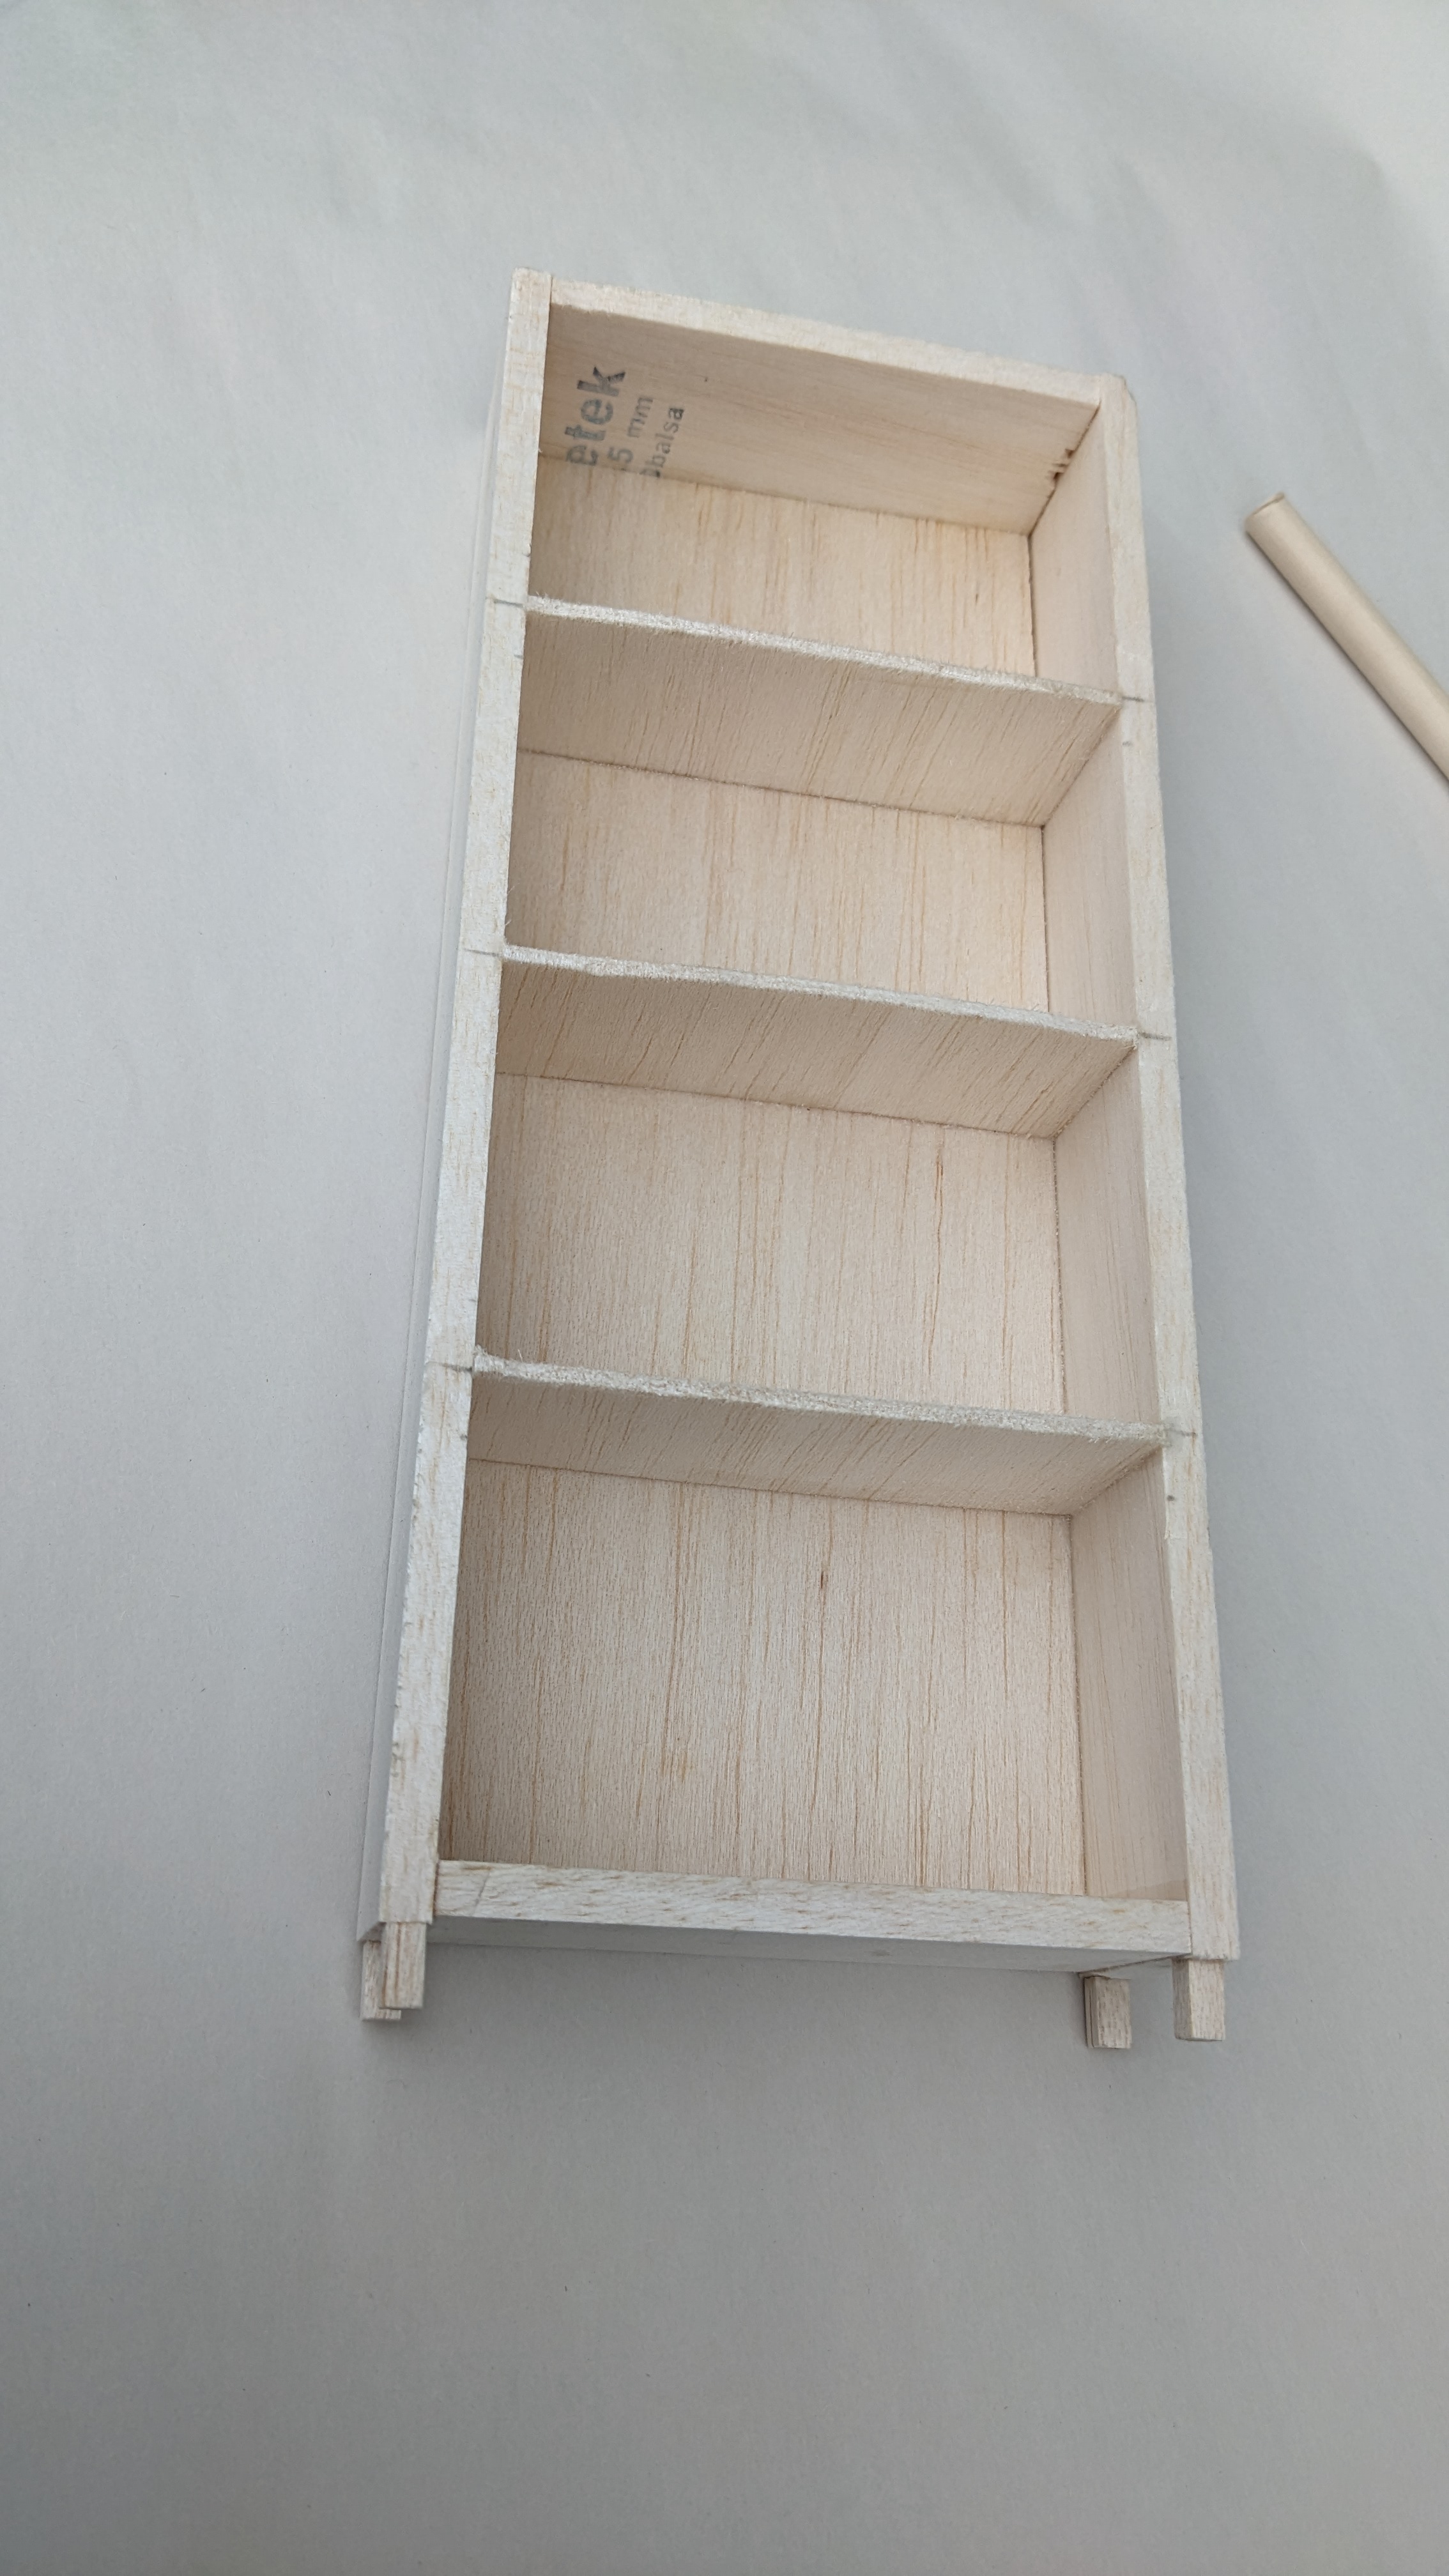
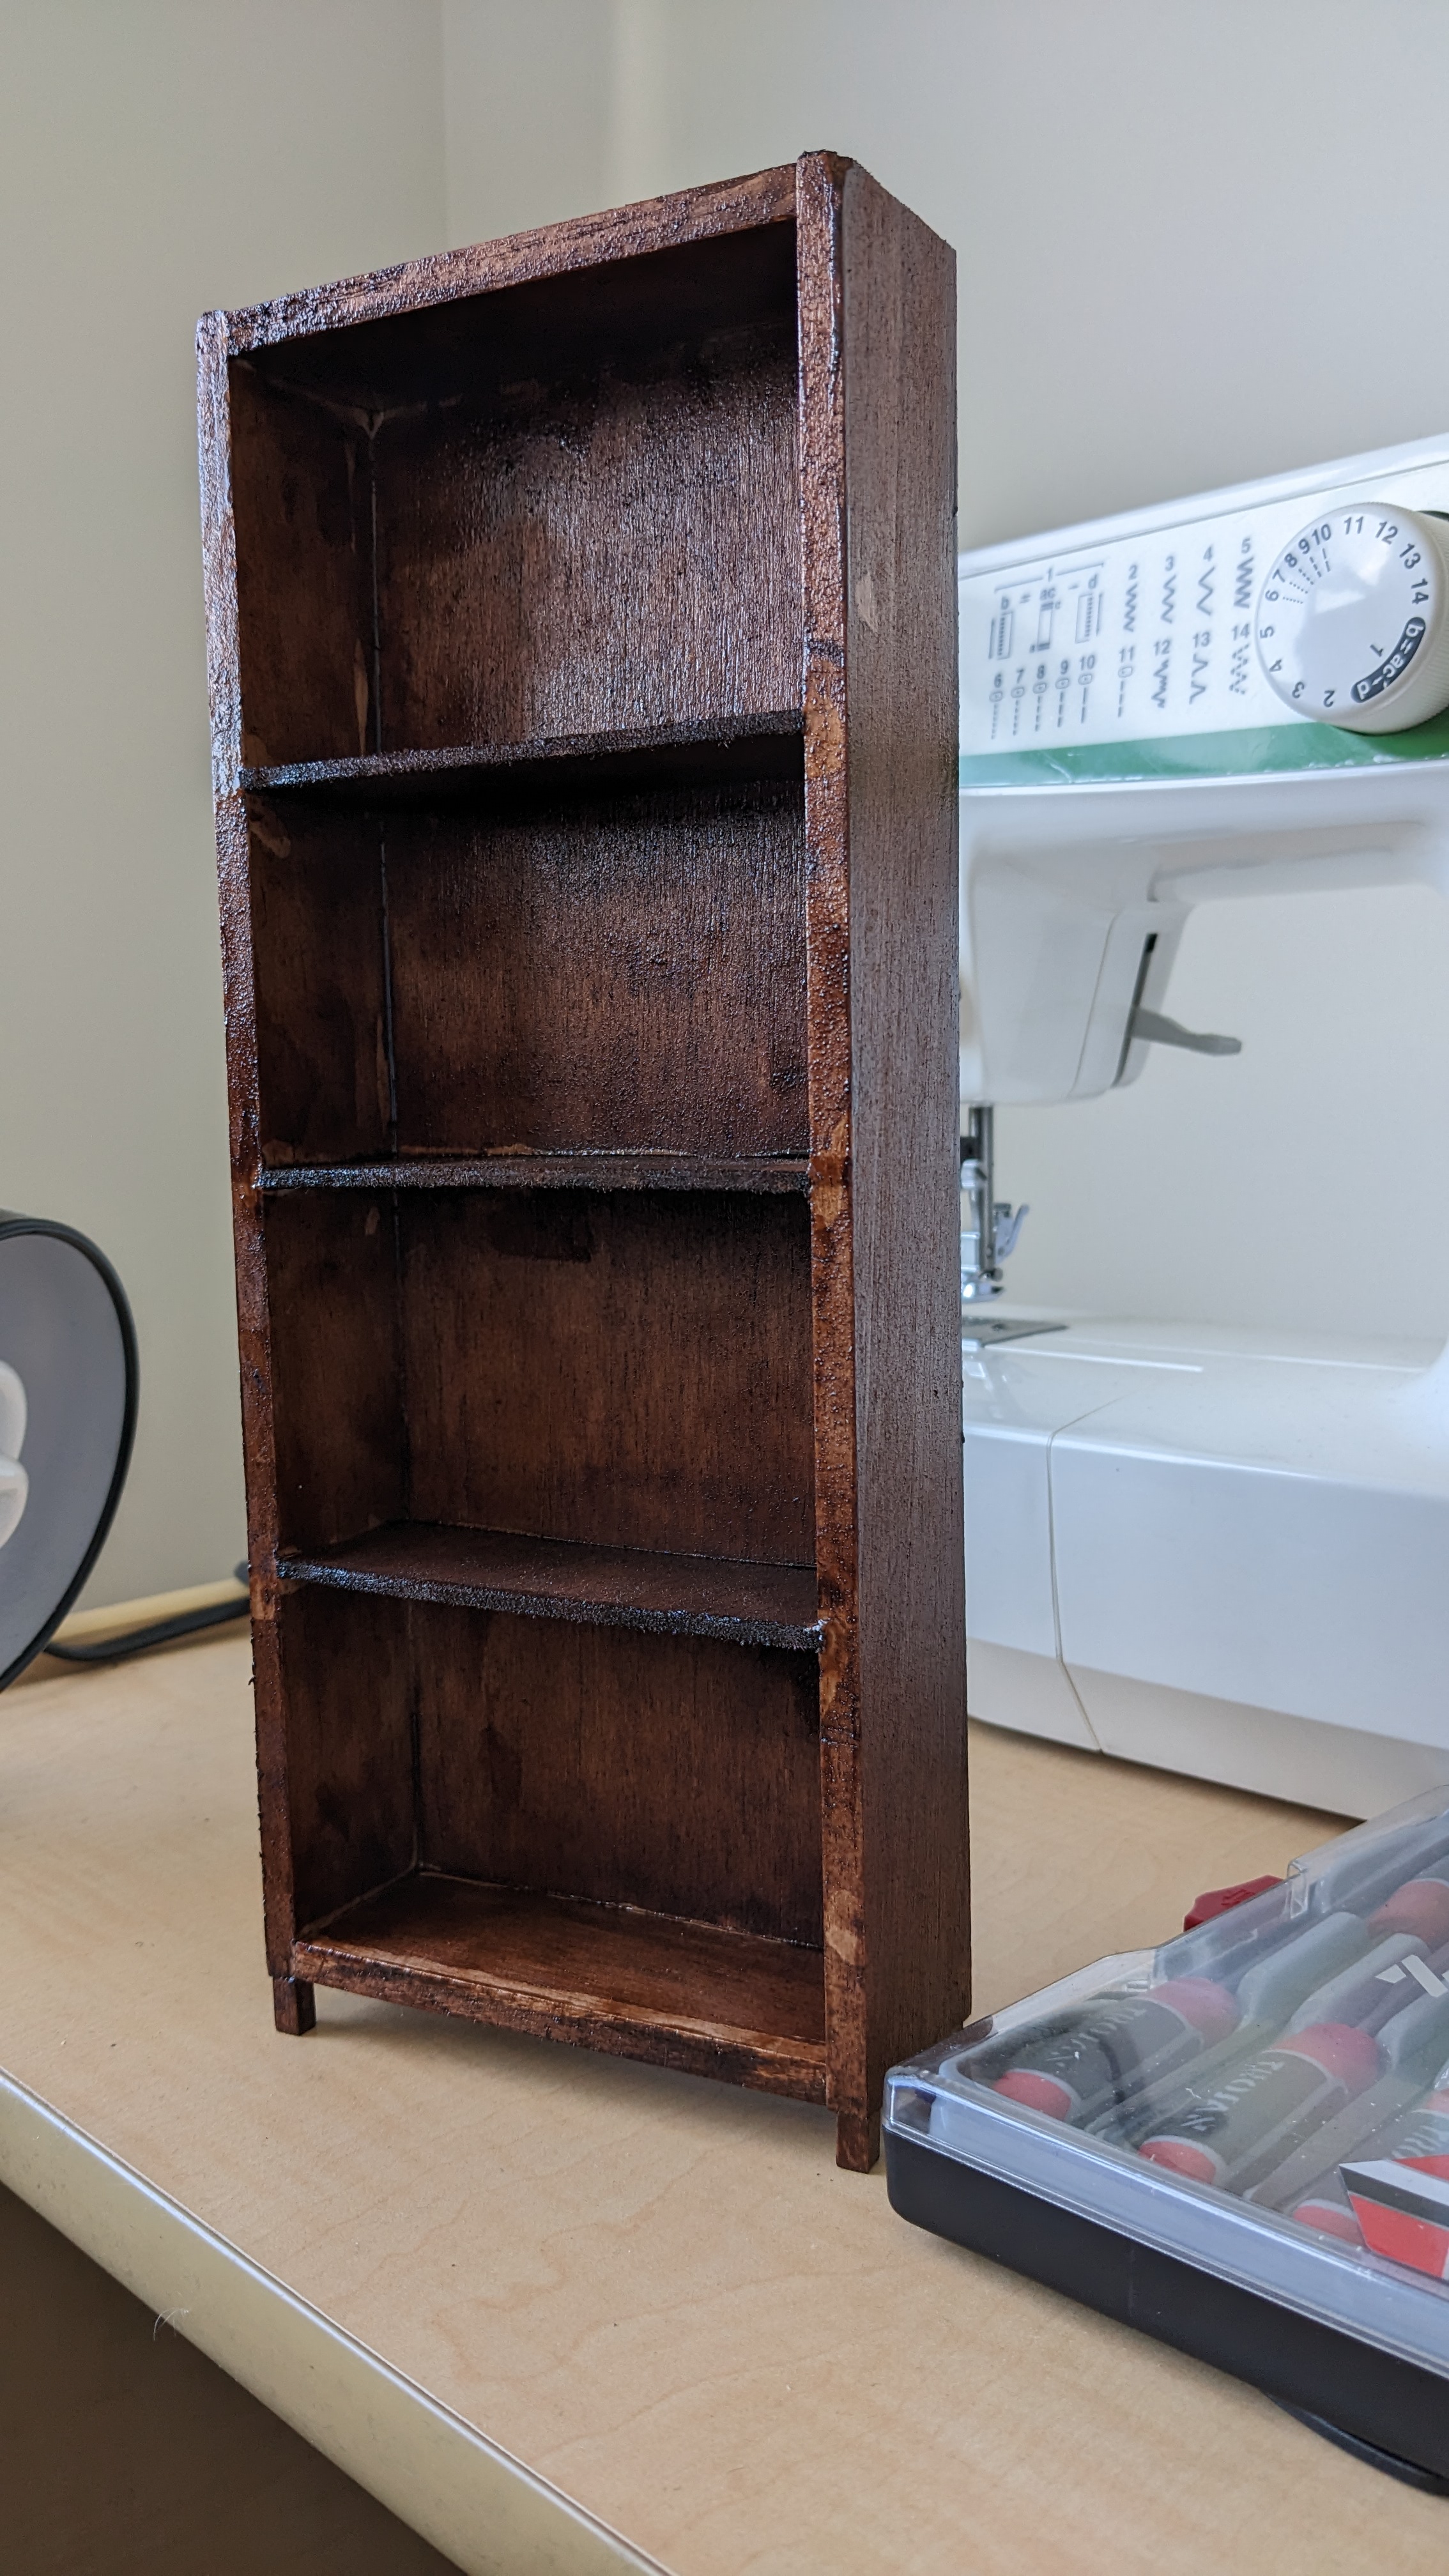
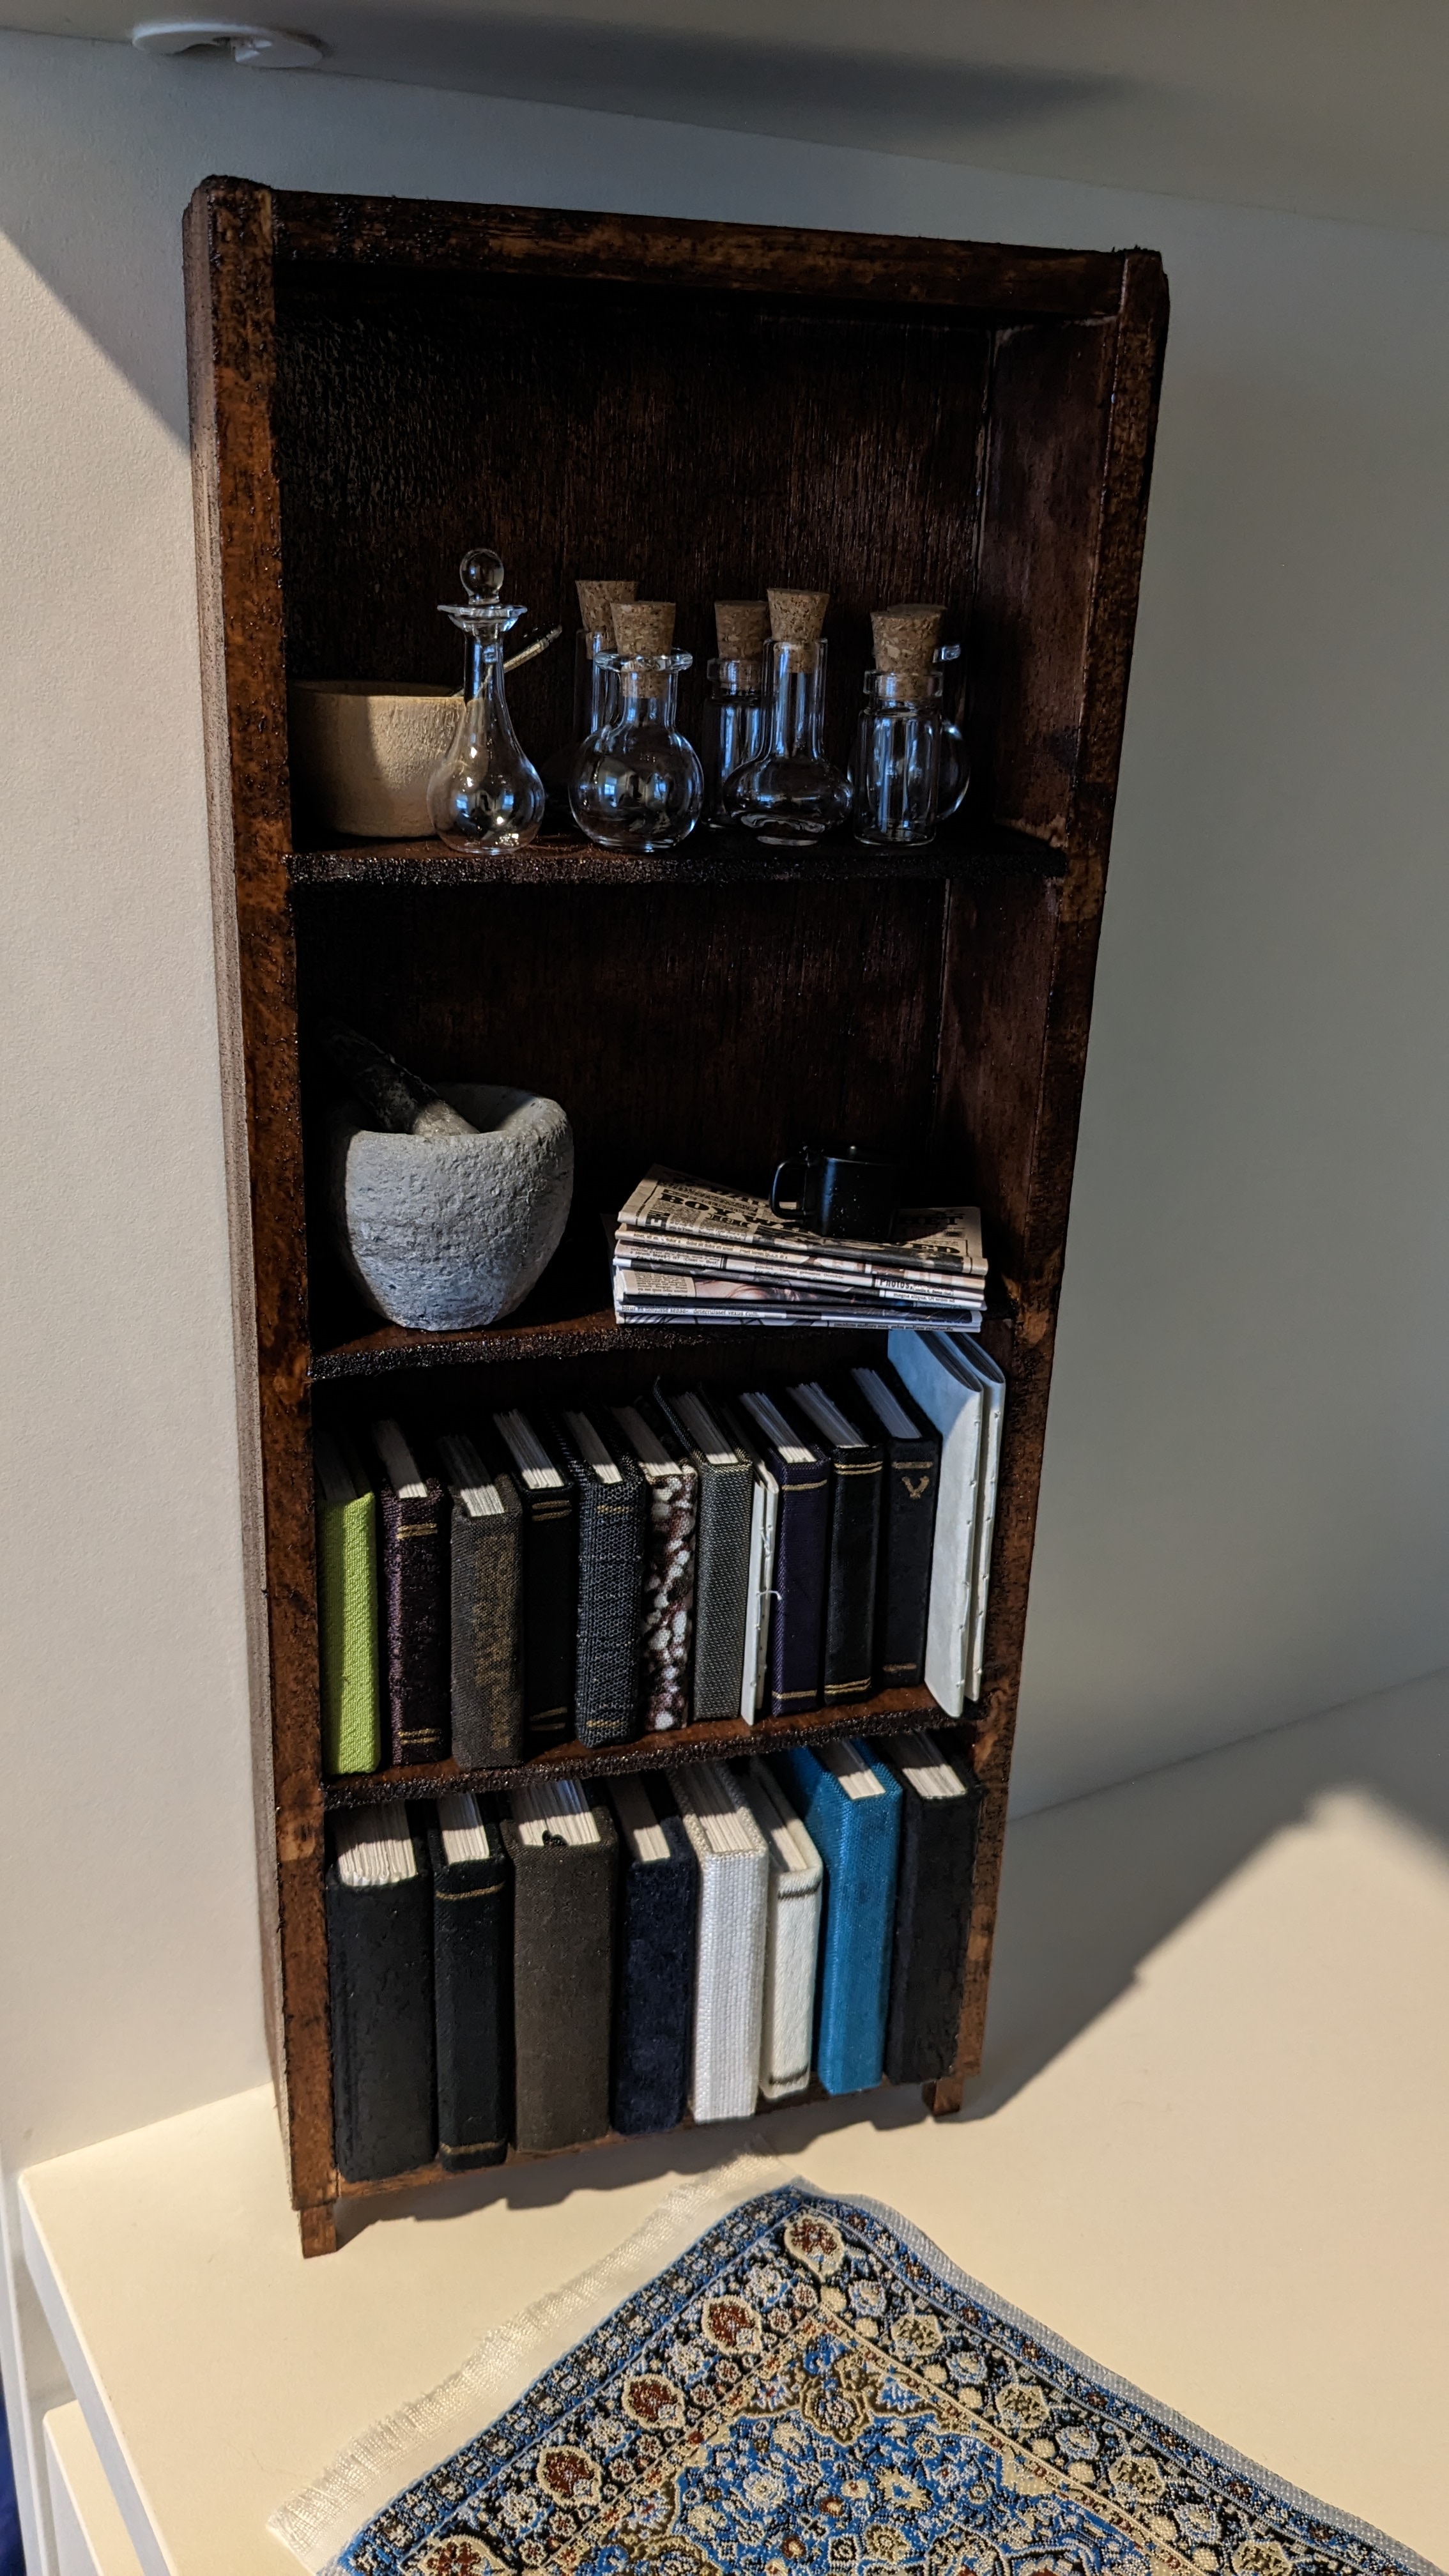
This weekend was a long weekend for me so I finally managed to finish the first piece of furniture! I made a bookcase! Yay! It's my first time working with balsa, so I'm still getting used to it. Balsa doesn't seem to sand very well, it tends to fray since it's so soft. I may need to trial some different techniques for my next pieces.
Here's some photos, hope you like them!
Oh yeah calligraphy on the covers would be awesome! It will be hard though, the pens I bought are 0.7mm which is about the smallest they sell, and while they have a great ink flow which shows up nice on the covers (much better than the gold sharpie I used on the first couple), there's really no way to get the kinds of calligraphy you can get using a wedge or plate tipped pen. I'd have to have a think about that. I considered using paint and then either calligraphy nibs or just a flat piece of plastic or wood to paint...
This weekend was a long weekend for me so I finally managed to finish the first piece of furniture! I made a bookcase! Yay! It's my first time working with balsa, so I'm still getting used to it. Balsa doesn't seem to sand very well, it tends to fray since it's so soft. I may need to trial some different techniques for my next pieces.
Here's some photos, hope you like them!

Quote from Heatherlly on February 7, 2023, 3:13 amHoly crap, that is amazing! What are the dimensions on the bookcase?
Holy crap, that is amazing! What are the dimensions on the bookcase?
Quote from Logan on July 9, 2023, 7:37 pmHello! It has been some time since I made an update, I apologize that I don't have any new crafts to share today, I only have an explanation for why there have been no crafts.... I have had an exciting few months!
In April I got hit by a truck on my motorcycle which was not very fun at all, and then just recently I spilled boiling hot caustic soda on my hand. So I have seen much more of the inside of emergency rooms than I would prefer, and I haven't really had the manual dexterity to be able to make anything for far too long.
In answer to the question about the size of the book case, it's about 25cm tall and 10cm wide. I think I'll make another that's double that width, so long as I can work out a way to support the middle of the shelf.
I hope to be able to get back into things once my skin regrows properly and I don't have to worry about blisters and such, but mostly I just wanted to keep contact and let you all know why you hadn't heard from me!
I'm not dead! Which right now feels like a victory! I will be back with new stuff hopefully pretty soon!
Hello! It has been some time since I made an update, I apologize that I don't have any new crafts to share today, I only have an explanation for why there have been no crafts.... I have had an exciting few months!
In April I got hit by a truck on my motorcycle which was not very fun at all, and then just recently I spilled boiling hot caustic soda on my hand. So I have seen much more of the inside of emergency rooms than I would prefer, and I haven't really had the manual dexterity to be able to make anything for far too long.
In answer to the question about the size of the book case, it's about 25cm tall and 10cm wide. I think I'll make another that's double that width, so long as I can work out a way to support the middle of the shelf.
I hope to be able to get back into things once my skin regrows properly and I don't have to worry about blisters and such, but mostly I just wanted to keep contact and let you all know why you hadn't heard from me!
I'm not dead! Which right now feels like a victory! I will be back with new stuff hopefully pretty soon!
